Blogger Store

Created for bloggers who want to start an e-commerce or shopping site, Blogger Store is a professional looking template compatible with Paypal or Google Checkout

  • Animated shopping cart
  • Dual dropdown menu bar
  • Automatic featured content carousel
  • Grid and list style post view
Blogger store shopping blogger template

Lightroom Photo Blog Template

A beautiful photo blog template that displays photos in gallery format and is available in two styles basic and advanced

  • Switchable background
  • Attractive theme font
  • Integrated social media icons
  • Left sidebar and navigation menu
Lightroom Photo Blog Template

Magpress

Magazine style theme adapted from wordpress

  • Featured slider section
  • Dual menu bar
  • Tabbed widget
  • 4 column footer
Magpress Magazine style Blog Template

Sens

A simple theme with a clean layout

  • Full width featured slider
  • 4 column footer
  • Social widgets integrated
Sens Blogger template

Pop Out Social Bookmarking Widget

A nice-looking pop out social bookmarking widget that allows readers to share their favorite post easily

  • Neat display
  • Easy to install
Add pop out social bookmarking widget for blogger

Glamour Neue, Photo Blog Template edit post

Posted by Bhavika On Wednesday, July 20, 2011 8 comments
Glamour Neue is a 3 column photo blog template created by DZignine. Its a lovely theme to showcase your photos featuring a slider, thumbnails below it and 3 column footer.
Glamour Neue, Photo Blog Template
To edit the slider, go to Edit Html and look for the below code -

<li><a href='#'><img src='img.jpg'/></a></li>

Now replace the first '#' with image link or post link, 'img.jpg' with your image, repeat the same steps for subsequent code. Keep the image width 900 px. When you click on the image it becomes a single column theme, and details like author, date stamp and labels appear below the post headline.

You can tweak the background, text color, font, etc via 'Template Designer'. Also you can change the scrolling speed of the slider from Edit Html, look for 'speed' and change its value. While you can utilise the footer to add more blogger widgets.

Download the Glamour Neue, Photo Blog Template
Read More or Download this Blogger Template

Shopping Cart Free Blogger Theme edit post

Posted by Bhavika On Friday, July 15, 2011 30 comments
Finally a shopping cart e-commerce theme for blogger. Designed by BloggerMint, its a 4 column free template that comes with 'Add to Cart' and 'PayPal Checkout' function for Blogger.
Shopping Cart Free Blogger Theme
Once the template is uploaded, go to Settings--Posts and Comments (or in old blogger Settings--Formatting), set the desired number of posts to be shown on the blog, and then next to Post Template, click on add and insert this code, save the changes -
shopping cart blogger template code
<table border="1" style="width: 660px;">
<tbody>
<tr>
<th class="item_thumb" id="thumb" width="45%"><a href="https://blogger.googleusercontent.com/img/b/R29vZ2xl/AVvXsEgoH96_c_-OG0VKTKR6MhY34Duinas6DANqpDhkJQ9023uWnj2f66TpnDFKjcsAAoQNgin8f91AcjeA1IFFxtSLH1lJEF3MkRLsUlKIPhKzXHfb_iHi1pL8zN853WYocXei5qQebWzTYBfb/s1600/blue.gif" onblur="try {parent.deselectBloggerImageGracefully();} catch(e) {}"><img alt="" border="0" id="BLOGGER_PHOTO_ID_5610175970378217570" src="https://blogger.googleusercontent.com/img/b/R29vZ2xl/AVvXsEgoH96_c_-OG0VKTKR6MhY34Duinas6DANqpDhkJQ9023uWnj2f66TpnDFKjcsAAoQNgin8f91AcjeA1IFFxtSLH1lJEF3MkRLsUlKIPhKzXHfb_iHi1pL8zN853WYocXei5qQebWzTYBfb/s400/blue.gif" style="cursor: hand; cursor: pointer; display: block; height: 164px; margin: 0px auto 10px; text-align: center; width: 148px;" /></a></th>
<td><input class="item_add" type="button" value="Add to Cart" /></td>
</tr>
<tr>
<th><b>Item Name</b></th>
<td class="item_name">Product Name Goes here!</td>
</tr>
<tr>
<th><b>Price</b></th>
<td class="item_price">$99.99</td>
</tr>
<tr>
<th><b>Description</b></th>
<td class="item_Description">Your product description here!</td>
</tr>
<tr>
<th><b>Available Stock</b></th>
<td>Stock count here!</td>
</tr>
<tr>
<th><b>Misc</b></th>
<td>Place extra thumbs/images of product here</td>
</tr>
</tbody>
</table>

This code will add the table in each 'New Post', now you have to fill in other information in the table like Item Name, Price and Description, which will be used as values during Paypal checkout. Also remove the default image from the code and add you own (keep the image sizes medium for it to fit properly).

Please not that you would have to remove the 'div class' and 'a href' from the image code, which should look something like this -

<div class="separator" style="clear: both; text-align: center;">
<a href="https://blogger.googleusercontent.com/img/b/R29vZ2xl/AVvXsEgpJKj-uK0vFD_dq4E7x7TzQ2ds-3hJXjEH5m27uyPfoSvM1Ri7CTrJz60qJynYKx4PsI3YaX9uDzEYvIBFpidmkyMCTxrHLc1GzeABOPYzjeetoFpI1KrH-0Knm8nifBBZqX4MF5YOMi7G/s1600/P1020156.jpg" imageanchor="1" style="margin-left:1em; margin-right:1em"><img border="0" height="240" width="320" src="https://blogger.googleusercontent.com/img/b/R29vZ2xl/AVvXsEgpJKj-uK0vFD_dq4E7x7TzQ2ds-3hJXjEH5m27uyPfoSvM1Ri7CTrJz60qJynYKx4PsI3YaX9uDzEYvIBFpidmkyMCTxrHLc1GzeABOPYzjeetoFpI1KrH-0Knm8nifBBZqX4MF5YOMi7G/s320/P1020156.jpg" /></a></div>

And keep only this code in the table, those are the only changes you need to make and publish your post -

<img border="0" height="240" width="320" src="YOUR_IMAGE.jpg" />

Now moving on to Paypal Email set-up, go to Template--Edit Html (Design--Edit Html in old blogger) and search for this code -

<script type='text/javascript'>
simpleCart.email = &quot;bloggermint@gmail.com&quot;;
simpleCart.checkoutTo = PayPal;
simpleCart.currency = USD;

Replace the text in bold, which is the Paypal email id, with your own and save the changes.
paypal checkout page for blogger shopping cart theme
For those who don't have a Paypal account or credit card, can still purchase the product by filling the contact form. In order to integrate the form, you need to follow the steps below -

1) Sign up for Kontactr, once that is done scroll down the page until you find “Ajax Embed Widget” or “Buttons Code” and get your Kontactr ID, it will look something like this - id=39662, copy it.

2) Access Edit Html and insert this code right before the closing </head> tag.

<script type="text/javascript" src="http://kontactr.com/kpu/kontactr.js"></script>

3)Now replace this code in Edit Html, it will appear in the top part of the CSS -

input.item_add{

with the one below -

span.item_add{

4) Similarly, search for this code -

input.item_add {

and change it to one below -

span.item_add {

The next step will be to go to Settings--Posts and comments, you will find the option 'Post Template' where you have to insert the following code, change the Kontactr id=39662 with yours -

<table border="1" style="width: 660px;">
<tbody>
<tr>
<th class="item_thumb" id="thumb" width="45%"><a href="https://blogger.googleusercontent.com/img/b/R29vZ2xl/AVvXsEgoH96_c_-OG0VKTKR6MhY34Duinas6DANqpDhkJQ9023uWnj2f66TpnDFKjcsAAoQNgin8f91AcjeA1IFFxtSLH1lJEF3MkRLsUlKIPhKzXHfb_iHi1pL8zN853WYocXei5qQebWzTYBfb/s1600/blue.gif" onblur="try {parent.deselectBloggerImageGracefully();} catch(e) {}"><img alt="" border="0" id="BLOGGER_PHOTO_ID_5610175970378217570" src="https://blogger.googleusercontent.com/img/b/R29vZ2xl/AVvXsEgoH96_c_-OG0VKTKR6MhY34Duinas6DANqpDhkJQ9023uWnj2f66TpnDFKjcsAAoQNgin8f91AcjeA1IFFxtSLH1lJEF3MkRLsUlKIPhKzXHfb_iHi1pL8zN853WYocXei5qQebWzTYBfb/s400/blue.gif" style="cursor: hand; cursor: pointer; display: block; height: 164px; margin: 0px auto 10px; text-align: center; width: 148px;" /></a></th>
<td><span class="item_add"><script type="text/javascript"> id=39662; t=1; ctxt="Order Now"; </script>
<script type="text/javascript" src="http://kontactr.com/kpu/kontactr.js"></script></span></td>
</tr>
<tr>
<th><b>Item Name</b></th>
<td class="item_name">Product Name Goes here!</td>
</tr>
<tr>
<th><b>Price</b></th>
<td class="item_price">$99.99</td>
</tr>
<tr>
<th><b>Description</b></th>
<td class="item_Description">Your product description here!</td>
</tr>
<tr>
<th><b>Available Stock</b></th>
<td>Stock count here!</td>
</tr>
<tr>
<th><b>Misc</b></th>
<td>Place extra thumbs/images of product here</td>
</tr>
</tbody></table>

Shopping Cart template also has a 4 column footer and a single sidebar on the right to display other blogger widgets like Archive, Categories, etc.

Download the Shopping Cart Free Blogger Theme
Read More or Download this Blogger Template

Capture Photo Template edit post

Posted by Bhavika On Wednesday, July 06, 2011 6 comments
Capture is a beautiful photo template created by Dzignine. The theme has minimalist white design and clean layout for a photography or portfolio blog.
Capture photo blogger template
The home page includes a photo gallery on the left, and on clicking an image it takes you the post page with more information related to the pictures. The blog title, tagline and the navigation bar is neatly placed next to the gallery.

Below it you can insert blogger widgets of your choice. The theme also has a 3-column footer to display your contact details, labels, popular posts etc.

Download the Capture Photo Template
Read More or Download this Blogger Template

Simplex Focus Blog Template edit post

Posted by Bhavika On Tuesday, July 05, 2011 1 comments
SimplexFocus is a 3 column blogger theme created by Simplex Design. It has a neat layout with nice hover on effects, featured post section and horizontal recent comments and category bar.
Simplex Focus free Blog Template
In order to change the header logo, click on Design--Edit Html and look for this code -

<a rel="home" title="Home" href="http://simplexfocus.blogspot.com">

Replace it with this code and save the changes -

<a rel="home" title="Home" href="yoursite url">
<img src="logo url"/>
</a>

The first post is highlighted with a bigger image and post summary, and on the right is the search box, ad space and social media icons to allow your readers to subscribe or follow your latest updates. You can modify the account details from Edit Html, simply replace the text in bold, and repeat the steps for twitter, RSS etc., as well.

<div class="widget1" id="subscribe-follow">
<div class="h4">Like, Follow, and Subscribe</div>
<a rel="nofollow" title="Fan us on Facebook" href="http://www.facebook.com/simplexdesignblog" class="fan-on-facebook"></a>

Do the same with this code and replace the text marked in bold -

<div class="widget1" id="site-sns">
<a title="SimplexDesign on Facebook" href="http://www.facebook.com/simplexdesignblog" class="sns-facebook">
<span class="icon sns-facebook"></span> SimplexDesign on Facebook <span class="raquo">»</span>
</a>

Each subsequent post appears in a thumbnail format and on hovering on it the post is highlighted with a short brief and it also shows the number of comments. When you enter the post, the category shows up on top along with the author name, date stamp and social bookmarking icons. While the sidebar pops up with links and images of your previous posts.
Simplex Focus Blog Template
Below the main post area, recent comments and categories are displayed in a horizontal manner. To add links in the category bar, search for this code in Edit Html and insert the links and text -
<div id="popular-tags">
<span class="nav-title">Category : </span>
<a href="">lifestyle</a>
<a href="">faces</a>
<a href="">interests</a>
<a href="">youth</a>
<a href="">money</a>
<a href="">news</a>
<a href="">work</a>
</div>

Download the Simplex Focus Blog Template
Read More or Download this Blogger Template

Thesis Theme for Blogger edit post

Posted by Clyde On Monday, July 04, 2011 1 comments
The Thesis Theme is a well known worpress template for the ability to customize it to suit any website. Today we have the thesis theme for blogger ported by New Blogging Tipz.
thesis for blogger
The template like most modern blog themes comes with a slider, luckily its not one thats too heavy but a smaller one similar to the hybrid theme. Apart from that there are two navigation menus that provides you enough of space to display all your categories, pages and links. The thesis for blogger theme comes with social media icons, read more for posts, a bunch of floating icons, adsense ready widgets and placement and a extremely functional footer that can be seen below.
thesis theme blog footerThe footer offers a nice section for the labels, a three column footer and a cross section column after that where you can add what you like.

The perks are not just with the home page, each post has a nicely crafted section that includes an ad with prime position and social icons besides it. The end of the post has an author description widget where you have your pic and bio etc.

To customize the navbar just look for the words, home, label one etc and replace it with your own links, for further customization you can always refer to the author site or post a comment for help.

Download the Thesis Theme for Blogger
Read More or Download this Blogger Template

Nivex Blogger Template edit post

Posted by Bhavika On Friday, July 01, 2011 1 comments
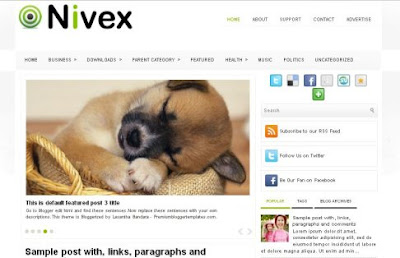
Nivex is a 2-column template created by FT Themes and adapted for blogger by Lasantha Bandara. The theme includes featured post slider, dual menu bar with dropdown and tabbed widget. Lets take a look at few steps to modify the blogger template.
Nivex Blogger Template
The second menu bar can be changed from Design--Edit Html, and search for this code -

<div class='menu-secondary-wrap'>

Below that you will see the code which needs to be changed, replace '#' with url to the post or category that needs to be linked and add the text as well. Repeat the same step for all the navigation links. To add your blog logo, you can access Page Elements and insert the image, size must be 294px width and 66px height.

Now for the featured slider, go to Design--Edit Html and find the below code -

<div class='featuredposts clearfix'>

That is the begining of the slider code, you have to replace 'This is default featured post 1 title' with your post title, add the post description, and image address and post link as mentioned in the code text. Save the changes and your slider is ready!

Below the slider each post appears in 'Read More' format with comments and date stamp displayed on the home page. The single column on the right features social media icons, search box and subscribe to blog link. While the tabbed widget allows you to display more content, in order to modify the tab names click on Edit Html and look for the below code -

<ul class='tabs-widget tabs-widget-widget-themater_tabs-1432447472-id'>
<li><a href='#widget-themater_tabs-1432447472-id1'>Popular</a></li>
<li><a href='#widget-themater_tabs-1432447472-id2'>Tags</a></li>
<li><a href='#widget-themater_tabs-1432447472-id3'>Blog Archives</a></li>
</ul>

This is followed by different blogger widgets like Recent posts, label cloud etc.

Download the Nivex Blogger Template
Read More or Download this Blogger Template

SimplexMag Blog Template edit post

Posted by Bhavika On Thursday, June 16, 2011 0 comments
Simplex Mag is a 3-column theme created for blogger by Simplex Design. Its a nice theme to use for a magazine or photo blog.
SimplexMag magazine free Blog Template
The template features dual navigation bar with a drop-down menu to display various categories and pages. The latest posts display in thumbnail format on the home page and the headline, label and date appears on hovering over the image.

The template includes the pagination script to set the number of posts on each page. Go to Settings->Formatting and insert the maximum number of posts you want to display on the home page to say 6, then go to Design->Edit Html, find this code -

<script type="text/javascript">
var pageNaviConf = {
perPage: 2,
numPages: 2,
firstText: "First",
lastText: "Last",
nextText: "Next",
prevText: "Prev"
}
</script>
Now change perPage value from 2 to 6 or whatever number you choose in the previous step and save the changes. The sidebar has the advertise option to show 125x125 ads from sponsors etc., that can be changed from Design->Page Elements. While the rest of the sidebar content can be customised as per your choice.

SimplexMag comes with a 3 column footer to show different widgets on your blog. Below that is the social bookmarking icons, you can change it from Design->Edit Html and add your account links (text marked in bold) -

<a class="i_rss" href="http://feeds.feedburner.com/Simplex"></a>
<a class="i_twitter" href="http://twitter.com/dinhquanghuy"></a>
<a class="i_facebook" href="http://www.facebook.com/simplexdesignblog"></a>
<a class="i_flicker" href="#"></a>
<a class="top_btn" href="#"></a>

Download the SimplexMag Blog Template
Read More or Download this Blogger Template

    Recent Templates

    Recent Comments

    Video Guides