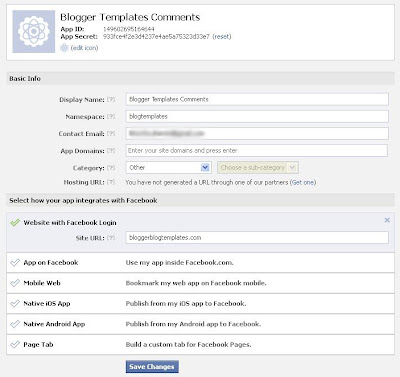
First step is to create a facebook application for your blog from Facebook Developers. Once you are on the page, click on 'Create New app' on the top right of the screen, put in the 'Application name', which can be anything like your blog name, it shouldn't be more than 32 characters. Next put 'App Namespace' which could anything as well, I put blogtemplates and click on continue. Don't tick on the last option on web hosting, its not required.
Next fill in the security text in the captcha box and submit.
In case you haven't added your mobile phone number in your Facebook account, it will show you a message to confirm your cell number. Once you add it, you will receive a SMS with the confirmation code from Facebook. Enter the code in the box and click on confirm, this will verify your account.Take down your application id, and in 'App Domains' enter 'blogspot.com'. If you host the blog on your own domain, then enter your domain name here. Below that you will find 'Website with Facebook Login', enter your site url and save changes. Your facebook application is ready to use.Log in to your blogger account, go to Template--Edit Html and search for the '' tag and add this code below it. Put in your facebook application id which you saved earlier, before adding -
<meta content="FACEBOOK-APP-ID" property="fb:app_id" />Next step is about adding the facebook comments code under the blog post, for that go to Edit Html, click on 'Expand Widget Templates' and search for this code -
<div class='post-footer-line post-footer-line-3'>
In case you don't find the above code, since all blogger templates are not the same, search for this code -
<p class='post-footer-line post-footer-line-3'>
If you still don't find it, then look for the code below, you will certainly find this one -
<data:post.body/>
Right after the line of code, whichever you found from the ones given above, insert the following code and save the changes. You can modify the width of the comment box, right now its 450px, or the change the colour scheme from 'light' to 'dark'.
<b:if cond='data:blog.pageType == "item"'> <div id="fb-root"></div> <script>(function(d){ var js, id = 'facebook-jssdk'; if (d.getElementById(id)) {return;} js = d.createElement('script'); js.id = id; js.async = true; js.src = "//connect.facebook.net/en_US/all.js#xfbml=1"; d.getElementsByTagName('head')[0].appendChild(js); }(document));</script> <fb:comments width='450' colorscheme='light' expr:title='data:post.title' expr:href='data:post.canonicalUrl' expr:xid='data:post.id'/> </b:if>The final step is to add the Facebook Namespace declaration in your code. Right on top of Edit Html you will find -
<htmlRight after this insert the code given below -
xmlns:fb="https://www.facebook.com/2008/fbml"This is how it should look -
The facebook namespace code is relevant for all the facebook widgets and applications, so don't add it again. Save the changes and the facebook comments will be functioning on our blog.
Please note that integrating facebook comments won't hide the Blogger comments, unless you select that option from Settings--Posts and comments--Comment Location, then select 'Hide'.
Moderation of Facebook comments
To keep a track on the facebook comments and moderate it, you have to visit the Comment Moderation tool. Click on settings on the top right corner and edit it as per your choice.
Share this Blogger Template:


0 Response to "Integrating Facebook Comments in Blogger"
Post a Comment