Blogger Store

Created for bloggers who want to start an e-commerce or shopping site, Blogger Store is a professional looking template compatible with Paypal or Google Checkout

  • Animated shopping cart
  • Dual dropdown menu bar
  • Automatic featured content carousel
  • Grid and list style post view
Blogger store shopping blogger template

Lightroom Photo Blog Template

A beautiful photo blog template that displays photos in gallery format and is available in two styles basic and advanced

  • Switchable background
  • Attractive theme font
  • Integrated social media icons
  • Left sidebar and navigation menu
Lightroom Photo Blog Template

Magpress

Magazine style theme adapted from wordpress

  • Featured slider section
  • Dual menu bar
  • Tabbed widget
  • 4 column footer
Magpress Magazine style Blog Template

Sens

A simple theme with a clean layout

  • Full width featured slider
  • 4 column footer
  • Social widgets integrated
Sens Blogger template

Pop Out Social Bookmarking Widget

A nice-looking pop out social bookmarking widget that allows readers to share their favorite post easily

  • Neat display
  • Easy to install
Add pop out social bookmarking widget for blogger

Johny Bingung, a Movie Review Blogger Template edit post

Posted by Bhavika On Thursday, July 05, 2012 0 comments
Johny Bingung is a 2 column movie or game review template created by Maskolis. The template features content slider, dual menu bar, category-wise display of posts, 3 column footer and much more.
Movie Review Blogger Template
Lets begin with the first menu bar, go to Edit Html and search for this code -
<li><a href='#'><span>Action</span>Big surprise</a></li>
<li><a class='arrow' href='#'><span>Box Office</span>The best movie</a>
<ul>
<li><a href='#'>DVD</a></li>
<li class='hr'/>
<li><a href='#'>Movie</a></li>
<li class='hr'/>
<li><a href='#'>Television</a></li>
</ul>
</li>
Replace '#' with your category links, change the text and the tagline like 'Big surprise' or 'The best movie' to suit your blog categories. Similarly, to edit the second menu bar, find the following code in Edit Html and make the changes. Replace 'sub menu 1, 2, 3' with sub-categories and you can add more categories under that as well. Follow the same steps for other sections and save the changes.
<div id='dropmenu'>
<div id='nav'>
<ul>
<li><a href='/' title='Home'>Home</a></li>
<li><a href='#' title='Drop menu'>Drop menu &#8250;&#8250;</a>
<ul class='children'>
<li><a href='#' title='Sub menu 1'>Sub menu 1 &#8250;&#8250;</a>
<ul class='children'>
<li><a href='#' title='Sub menu 1.1'>Sub menu 1.1</a></li>
<li><a href='#' title='Sub menu 1.2'>Sub menu 1.2</a></li>
<li><a href='#' title='Sub menu 1.3'>Sub menu 1.3</a></li>
</ul>
</li>
Moving on to the featured content slider, it picks up articles based on the selected label or category. Go to Layout, click on 'edit' feature content slider and add the label in 'content' box.
Below the navigation bar is the search box, category drop down section and subscription email box. In order to change the feed address, in Edit Html, check the expand widget templates box and find this code. Add your feed url in places marked in bold.

<form action='http://feedburner.google.com/fb/a/mailverify' id='subscribe' method='post' onsubmit='window.open(&apos;http://feedburner.google.com/fb/a/mailverify?uri=blogspot/htbgh&apos;, &apos;popupwindow&apos;, &apos;scrollbars=yes,width=550,height=520&apos;);return true' target='popupwindow'><input id='subbox' name='email' onblur='if (this.value == &apos;&apos;) {this.value = &apos;Enter your email address...&apos;;}' onfocus='if (this.value == &apos;Enter your email address...&apos;) {this.value = &apos;&apos;;}' type='text' value='Enter your email address...'/><input name='uri' type='hidden' value='blogspot/htbgh'/><input name='loc' type='hidden' value='en_US'/><input id='subbutton' type='submit' value='Enter'/></form>

The main column automatically displays post thumbnails with comments in a grid format. While the sidebar comes with widgets which can be customised, you can show reviews from a particular category/label. To activate that feature, go to Layout, click on 'Edit' Moview Review and insert the below code, replace the text marked in bold with your blog url and the label -

<script type='text/javascript'>var numposts = 1;var showpostthumbnails = true;var displaymore = false;var displayseparator = false;var showcommentnum = false;var showpostdate = false;var showpostsummary = true;var numchars = 60;</script>

<script type="text/javascript" src="/feeds/posts/default/-/play station?orderby=updated&alt=json-in-script&callback=labelthumbs"></script>

<script type="text/javascript">
function recentpostslist(json) {
document.write('<ul>');
for (var i = 1; i < json.feed.entry.length; i++)
{
for (var j = 1; j < json.feed.entry[i].link.length; j++) {
if (json.feed.entry[i].link[j].rel == 'alternate') {
break;
}
}
var entryUrl = "'" + json.feed.entry[i].link[j].href + "'";//bs
var entryTitle = json.feed.entry[i].title.$t;
var item = "<li>" + "<a href="+ entryUrl + '" target="_blank">' + entryTitle + "</a> </li>";
document.write(item);
}
document.write('</ul>');
}
</script>
<script src="http://johny-backup.blogspot.com/feeds/posts/summary/-/play station?max-results=6&alt=json-in-script&callback=recentpostslist"></script>
<a href="http://johny-backup.blogspot.com/search/label/play station" style="float:right;font:normal 11px Arial;padding:5px 0;">More on this category &#187;</a>
The internal post pages include social bookmarking icons, related articles and Facebook like button, making it easy to share content. The theme also has a neat looking comment form, to get that working simply replace your blog id in the code below, which is marked in bold.

<div class='cm_reply'>
<a expr:href='&quot;https://www.blogger.com/comment.g?blogID=4900105838884725772&amp;postID=&quot; + data:post.id + &quot;&amp;isPopup=true&amp;postBody=%40%3C%61%20%68%72%65%66%3D%22%23&quot; + data:comment.anchorName + &quot;%22%3E&quot; + data:comment.author + &quot;%3C%2F%61%3E#form&quot;' onclick='javascript:window.open(this.href, &quot;bloggerPopup&quot;, &quot;toolbar=0,location=0,statusbar=1,menubar=0,scrollbars=yes,width=600,height=500
&quot;); return false;'>Reply</a>
</div>
You will get the blog id on your browser address bar when you go to the dashboard.

Download the Johny Movie Review Blogger Template
Read More or Download this Blogger Template

Lugas Photo Blogger Template edit post

Posted by Bhavika On Tuesday, June 19, 2012 0 comments
Lugas is a 2 column free blogger template created by Iksandi, it includes right sidebar, gallery-style layout which is good to use for a photo blog, 3 column footer, social icons and posts thumbnails.
Lugas Photo Blogger Template

The header section shows different social media icons, you have to insert your account name in the below code from Template--Edit Html -
<!-- Start - Social Links -->
<li class='icon'><a href='https://plus.google.com' target='_blank'><img src='https://blogger.googleusercontent.com/img/b/R29vZ2xl/AVvXsEgS-bSYMWcPTKkc3zET42iSoQap50S6Yrx8cSOyUQ_afn_UKU5gOd9xpMRAtXmgIGi6joMnc9QZuan-Zrosi4Wn1uq6mao-Q2ws61vr6a7lPoHPa2A075vK7V-MxuXQjtO19a1RYizh42c/s0/G.png'/></a></li>
<li class='icon'><a href='http://www.facebook.com' target='_blank'><img src='https://blogger.googleusercontent.com/img/b/R29vZ2xl/AVvXsEhDXb99ZjIZoy1X55xjInxFm1nn_XSfS6H3BpPorFXlbVDXpD2gylaBYikdo0clphOw2L2KnEGnw9LW-w1FXBcEX09D4WKK5Ak4DK9aQmhx8ABbvnO1ICouVW3K-OcBrcqxgNHRcstgnRI/s0/Fb.png'/></a></li>
The menu bar links have to be changed from Edit Html, and the code to look for is -
<li><a expr:href='data:blog.homepageUrl'>HOME</a></li>
<li><a href='#'>CATEGORY</a><ul>
<li><a href='http://thelugastemplate.blogspot.com/search/label/Scenery?max-results=15'>SCENERY</a></li>
<li><a href='http://thelugastemplate.blogspot.com/search/label/People?max-results=15'>PEOPLE</a></li>
<li><a href='http://thelugastemplate.blogspot.com/search/label/Folks?max-results=15'>FOLKS</a></li>
<li><a href='http://thelugastemplate.blogspot.com/search/label/Daily?max-results=15'>DAILY</a></li>
</ul></li>
<li><a href='http://thelugastemplate.blogspot.com/p/friends.html'>FRIENDS</a></li>
You can add sub categories as well, below 'Category' in the code and save the changes. Below the menu bar is a small box to display a welcome message, tagline or any other text, search for this code in Edit Html and change the text marked in bold.
<!-- Start - put your amazing slogan here! -->
put your amazing slogan here!
<!-- End - put your amazing slogan here! -->

The photos are displayed neatly in gallery style, on hovering over it the picture slides to show the title and summary text, the look of the gallery is similar to Pinterest. The images have lightbox effect added to them, which is lighter and compact than the default Blogger lightbox.

Each post has the Facebook like button and Google Plus integrated along with related post widget and comment form at the end of it. The single sidebar shows only in the internal pages, where you can show different blogger widgets.

Download Lugas Photo Blogger Template
Read More or Download this Blogger Template

Jazzytube Video Blogger Template edit post

Posted by Bhavika On Tuesday, June 19, 2012 2 comments
Jazzytube is a video blogger template created by Maskolis, this is the second video template after Blogger tube. Its a 2 column theme to display YouTube videos only, includes dual menu bar, 3 column footer, right sidebar and a clean layout.
Jazzytube Video Blogger Template
Lets start off with uploading the video in your post, copy the YouTube code as shown in below screenshot -
jazzytube video blog template copying the youtube code
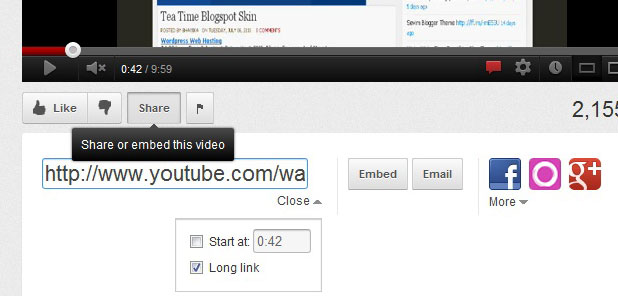
Another way to get the code is by clicking on share at the bottom of the video, then check the box next to the long link, and copy the URL, as shown below -
jazzytube video blog template copying the youtube code
Now create a new post in HTML mode (do not compose), paste the YouTube URL and insert endofvid at the end without leaving any space. To add text to the post, start by using the code [starttext] and ending with the code [endtext]. It will look like this -
http://www.youtube.com/watch?v=67n6JrlUjDYendofvid

[starttext]
Your description here..........
[endtext]

In the sidebar you can display video widget per category, in order to do that go to Layout, select HTML / Javascript gadget and enter the below code in it -

<script style="text/javascript">
var numposts = 3;
var showpostthumbnails = true;
var displaymore = true;
var displayseparator = true;
var showcommentnum = true;
var showpostdate = true;
var showpostsummary = true;
var numchars = 70;
</script>
<script src="/feeds/posts/default/-/sting?orderby=published&alt=json-in-script&callback=showlabelpostswiththumbs"></script>
Replace 'sting' (marked in bold) with the label you want to display in the sidebar. Each video post also shows social bookmarking icons and related articles at the end of the post.

To edit the first menu bar, go to Edit Html and search for this code -

<div class='menuhorisontal'>
<ul>
<li><a href='/'>Home <span>My Frontpage</span></a></li>
<li><a href='#'>About <span>All About this blog</span></a></li>
<li><a href='#'>Contact Us<span>Leave your message</span></a></li>
<li><a href='#'>Health<span>Take a trip</span></a></li>
<li><a href='#'>Economics<span>Human Needs</span></a></li>
<li><a href='#'>Lifestyle<span>Be Your Self</span></a></li>
</ul>
</div>

Now replace '#' with links and the default text with your blog categories, in this template you can add a little brief as well below the main category, like under 'About' it says 'All About this', you can replace it and save the changes. In the second menu bar, pages will automatically show on the home page.

Overall, Jazzytube is a nice and easy to use theme for video blogging, you can customise the sidebar and footer as per your blog content.

Download the Jazzytube Video Blogger Template

Read More or Download this Blogger Template

Johny Magstore Shopping Blogger Template edit post

Posted by Bhavika On Wednesday, May 30, 2012 4 comments
Johny Blackstore is a beautiful e-commerce blogger template created by Maskolis. The shopping store template is packed with features like a dual menu bar, slider to display latest products, grid and list view of products on home page, simple panner and zoomer for users to take a better look at the product, social media profiles and more.
Johny Magstore Shopping Blogger Template
Lets start with the horizontal bar on top where the social media icons are displayed along with the search box. To add your links, go to Edit Html and search for this code, and replace '#' with your facebook, twitter etc., account ids.
<ul class='isocial'>
<li><a class='rss' href='#' target='_blank' title='Subscribe via RSS'/></li>
<li><a class='facebook' href='#' target='_blank' title='Become a Fan'/></li>
<li><a class='twitter' href='#' target='_blank' title='Follow Us'/></li>
<li><a class='google' href='#' target='_blank' title='Google Plus Profile'/></li>
<li><a class='youtube' href='#' target='_blank' title='Watch The Video'/></li>
</ul>
Coming to the first menu bar with drop down, look for this code in Edit Html -
<ul id='top'>
<li><a href='/'><span>Welcome</span>Homepage</a></li>
<li><a href='#'><span>This is</span>About Us</a></li>
<li><a class='arrow' href='#'><span>Support</span>Contact Us</a>
<ul>
<li><a href='#'>Goggle +</a></li>
<li class='hr'/>
<li><a href='#'>Contact on Facebook</a></li>
<li class='hr'/>
<li><a href='#'>Contact on Twitter</a></li>
</ul>
Now replace '#' with category links or any page links, this template shows a small tagline below each heading in the menu bar, you can change the text to display, like in the above code its given 'This is' .....'About us', edit it if you like.

Similarly, for the second menu bar, look for this code -
<li><a href='http://feeds.feedburner.com/JohnyTemplate' title='Posts RSS'>Posts RSS</a></li>
<li><a href='http://johnytemplate.blogspot.com/feeds/comments/default' title='Comments RSS'>Comments RSS</a></li>
<li><a href='http://johny-darktube.blogspot.com/p/sample-page.html'>Sample Page</a></li>
Change the links, title, category name etc., and save the changes. Coming to setting up the product details, the below code has to appear in each post, instead of copying and pasting everytime, insert it in Settings--Posts and Comments--Post Template click on 'add' and paste the below code -
<div class="product_image">
<div class="pancontainer" data-orient="center" data-canzoom="yes" style="width:150px; height:150px;">
<img border="0" class="item_thumb" src="product_image.jpg" /></div>
<span class="item_price">$00.00</span> </div>
<div class="product_describe">
Descriptions... </div>
Every time when you to go to create a new post or add a new product, the code will be there in the posting area. You need to change the below details in the code -

src="product_image.jpg" /> - add your product image url, image size should be 300px-300px.
$00.00 - Price of the product
Descriptions... - product description

This template uses simplecart of wojodesign.com and it supports top currency like Dollar, Pound Sterling and Euro. To replace the Paypal account with yours, find the code below -
<script type='text/javascript'>
simpleCart.email = &quot;johnytemplate@gmail.com&quot;;
simpleCart.checkoutTo = PayPal;
simpleCart.currency = USD;
simpleCart.taxRate = 0.02;
simpleCart.shippingFlatRate = 3.25;
simpleCart.shippingQuantityRate = 1.00;
simpleCart.cartHeaders = [&quot;thumb_image&quot; , &quot;Quantity_input&quot; , &quot;Total&quot;, &quot;remove&quot; ];
</script>
Replace the text marked in bold with your email id and save the changes.
setting up the featured slider for shopping blogger template
The slider automatically picks up posts based on the label you have selected, to enable that feature go to Layout, click on 'edit' featured content slider, put in the label of your choice, save and the slider will be functioning. The product will be displayed when you hover on the image. Below the slider you will find the Grid and list view icon, you can see how the display changes, its a cool feature of this template.

Shopping cart is on top left which shows the costing details and checkout. The template has 2 columns on either side and also a related products widget at end of each post.


Download the Johny Magstore Shopping Blogger Template
Read More or Download this Blogger Template
Italian Food Blogger Theme edit post

Posted by Bhavika On Friday, May 25, 2012 0 comments
Italian Food as the name suggests is a 2 column food theme created by Chica Blogger. The blogger template comes with featured slider, social media icons, twitter widget and 3 column footer.
Italian Food Blogger Theme
To set up the slideshow, go to Template--Edit Html and look for the below code -

<div id='slider'>

<a href='#' title='Introducing Blogger Theme'>

<img alt='' src='https://blogger.googleusercontent.com/img/b/R29vZ2xl/AVvXsEjx4-SWDNozAiQw62YmeY4S-MBc1pW-Jbu59Y6i36HQE1q3sA9V7NDRaD9vvRQC-S8VabCws2rxanYTGHTiuEFuF8Ws6PfTdAzarlnGD2crIF1__a8FB67i-he6pWc_UbRh0MsVONGt1HM/s1600/1.jpg' title='Introducing Blogger Theme'/>

</a>

<a href='#' title='Another image in a post'>

<img alt='' src='https://blogger.googleusercontent.com/img/b/R29vZ2xl/AVvXsEjbdLQ5rJlEmKQHRgf6-ovYSjPnqq5CVj0YAb_3V0wLUhPAYW4WMDjcEfneO2VgRIGbl1CYQJ0qie_4mwqg-h6pfkFLCY3ipqUglvT5UyFOdfTN2b6RIRhjfMpuR1GTKAfo0bATRGiFPYY/s1600/2.jpg' title='Another image in a post'/>

</a>
Now replace '#' with your post link, change the title, image link and image alt text, follow the same steps for all the slides. Make sure all images are 900 x 300px. Above the slider in the menu bar are the social media icons - Facebook, twitter and RSS - you can change the links from Edit Html, click on 'Expand widget templates' and find the following code -

<div id='social'>
<a href='#'>
<img alt='Twitter' src='https://blogger.googleusercontent.com/img/b/R29vZ2xl/AVvXsEgKK4yTYL20xRSkDAMKY7-CUr0g3f7qotmWqsbQbpN0LqpWa71QzRcgpsH6o3BlKJVOy7e3JGgyKWZlZZGf_AlTnd15KAqsAeFiEJR4N5SuHcadIX1iZdIFoD2FMyhluYR477A5QJJSLxE/s1600/twitter.png' title='Twitter'/></a>
<a href='#'>
<img alt='Feed' src='https://blogger.googleusercontent.com/img/b/R29vZ2xl/AVvXsEgQL_SyLDesRNTVHrF1o87cbZDdk4HysqmTwtVclpR_P8zqSfugygVogpgZMhIKkvvE24BlTA6ztK-Nl5MiLG-c4dRd0js4elZ3ywnExT4aYlbHiTiFGTyPV9oiAmKlRPkiKb60n-YCN_o/s1600/rss.png' title='RSS'/></a>
<a href='#'>
<img alt='Facebook' src='https://blogger.googleusercontent.com/img/b/R29vZ2xl/AVvXsEglpBnr3cTIi6JlJc4rquL2plJDKR-HybhoSYr7tT5acXETgaQgH1dngOxWGm0V9p4B8ixf0nr8UjW7RxCmHZ3HvY0YNSeILfPuKeVF0Pqf74niLts4KdcOVIbzKnViyIt-YAVKX_igQ-Q/s1600/facebook.png' title='Facebook'/></a>
</div>
Replace '#' with your social ids and save the changes. The main column has the usual format of displaying post summary with thumbnails along with author, date and comments.

The sidebar has an integrated search box, and the bottom of the main column is the twitter widget that shows your latest tweet. You need to insert your twitter handle from Edit Html -
<div id='twitter-widget'>

<li class='twitter-updates'>

<ul id='twitter_update_list'/>
<a href='http://twitter.com/claudiacs' id='twitter-link'/>
<script src='http://twitter.com/javascripts/blogger.js' type='text/javascript'/>
<script src='http://twitter.com/statuses/user_timeline/claudiacs.json?callback=twitterCallback2&amp;count=1' type='text/javascript'/>

</li>

</div
Simply replace 'claudiacs' with your own id, it appears twice in the code. The 3 column footer can be used to show blogger widgets of your choice.

Download the Italian Food Blogger Theme
Read More or Download this Blogger Template

Green Health Blog Template edit post

Posted by Bhavika On Thursday, May 24, 2012 1 comments
Green Health is a 2 column blogger template created by Lasindu Nadishan. It has a nice cascading slider, dual menu bar with dropdown and a 3 column footer.
Green Health Blog Template
The top menu bar on the right can be edited from Edit Html and search for this code -
<div id='pagemenucontainer'>
<ul id='pagemenu'>
<li><a href='/'>Home</a></li>
<li><a href='#'>About</a></li>
<li><a href='#'>Contact</a></li>
<li><a href='#'>Advertise</a></li>
</ul>
Replace '#' with your page links and insert relevant titles, save the changes. Similarly, for the second menu bar look for this code in Edit Html.
<div class='menu-secondary-container'>
<ul class='menus menu-secondary'>
<li><a href='#'>Home</a></li>
<li><a href='#'>Business</a>

<ul class='children'>
<li><a href='#'>Money</a></li>
<li><a href='#'>Health</a></li>
<li><a href='#'>Social</a></li>
</ul>
</li>
Now here you have to insert the sub-categories under 'children' along with the links, follow the same steps for all the categories. Moving on to the slider, search for this code -
<div id='slidewrap'>
<ul class='kwicks horizontal'>
<li id='kwick_1'>
<span class='fadeout'/>
<div class='excerpt'>
<h2><a href='http://www.coolbthemes.com/' rel='bookmark' title='Permanent Link to Quas molestias excepturi'>Quas molestias excepturi</a></h2>
</div>
<img alt='Quas molestias excepturi' height='305' src='https://blogger.googleusercontent.com/img/b/R29vZ2xl/AVvXsEhOcgHYhIenBHIO5cA-4rtLtjjGZH3aGm0ur27JstLK5s9t8NDxGcUzE_AAMOC2-AP7_NdydKyo53Hr9MPfBJsg6raSeETciP4X0YFFktY0lcQdwUJQNw5a0whyphenhyphenD9nvC1Fzy1tKRYHQ_b6M/s1600/1.jpg' width='600'/>
</li>
Replace the post link, title, add in your own image url, keep the image size 960px x 400px and 'alt' text, follow the same steps for the remaining slides. The main column has the same format of displaying articles, thumbnails with a summary about the post, along with author, comments, time and date stamp.

The single sidebar shows social profiles in a neat manner and different blogger widgets. One thing I found missing in this template is a search box, you can probably add the Google Custom Search in the sidebar. The 3 column footer as well can be utilised to show varied content.

Download the Green Health Blog Template
Read More or Download this Blogger Template

Integrating Facebook Comments in Blogger edit post

Posted by Bhavika On Thursday, May 17, 2012 0 comments
creating facebook comments application for blogger
Integrating Facebook comments in your blogger blog is a convenient way for users to simply post a comment instead of signing from other accounts. There are couple of steps involved, which are simple as well, but once its done, see the comments flowing in.

First step is to create a facebook application for your blog from Facebook Developers. Once you are on the page, click on 'Create New app' on the top right of the screen, put in the 'Application name', which can be anything like your blog name, it shouldn't be more than 32 characters. Next put 'App Namespace' which could anything as well, I put blogtemplates and click on continue. Don't tick on the last option on web hosting, its not required.

Next fill in the security text in the captcha box and submit.
filling security code for facebok application

In case you haven't added your mobile phone number in your Facebook account, it will show you a message to confirm your cell number. Once you add it, you will receive a SMS with the confirmation code from Facebook. Enter the code in the box and click on confirm, this will verify your account.
Take down your application id, and in 'App Domains' enter 'blogspot.com'. If you host the blog on your own domain, then enter your domain name here. Below that you will find 'Website with Facebook Login', enter your site url and save changes. Your facebook application is ready to use.
facebook application for blog comments
Log in to your blogger account, go to Template--Edit Html and search for the '' tag and add this code below it. Put in your facebook application id which you saved earlier, before adding -
<meta content="FACEBOOK-APP-ID" property="fb:app_id" />
add facebook application id in blogger html
Next step is about adding the facebook comments code under the blog post, for that go to Edit Html, click on 'Expand Widget Templates' and search for this code -
<div class='post-footer-line post-footer-line-3'>

In case you don't find the above code, since all blogger templates are not the same, search for this code -
<p class='post-footer-line post-footer-line-3'>

If you still don't find it, then look for the code below, you will certainly find this one -

<data:post.body/>

Right after the line of code, whichever you found from the ones given above, insert the following code and save the changes. You can modify the width of the comment box, right now its 450px, or the change the colour scheme from 'light' to 'dark'.
<b:if cond='data:blog.pageType == "item"'> <div id="fb-root"></div> <script>(function(d){ var js, id = 'facebook-jssdk'; if (d.getElementById(id)) {return;} js = d.createElement('script'); js.id = id; js.async = true; js.src = "//connect.facebook.net/en_US/all.js#xfbml=1"; d.getElementsByTagName('head')[0].appendChild(js); }(document));</script> <fb:comments width='450' colorscheme='light' expr:title='data:post.title' expr:href='data:post.canonicalUrl' expr:xid='data:post.id'/> </b:if>
adding facebook code in edit html
The final step is to add the Facebook Namespace declaration in your code. Right on top of Edit Html you will find -
<html
Right after this insert the code given below -
xmlns:fb="https://www.facebook.com/2008/fbml"
This is how it should look -
adding facebook comments code in blogger html
The facebook namespace code is relevant for all the facebook widgets and applications, so don't add it again. Save the changes and the facebook comments will be functioning on our blog.

Please note that integrating facebook comments won't hide the Blogger comments, unless you select that option from Settings--Posts and comments--Comment Location, then select 'Hide'.

Moderation of Facebook comments
moderating facebook comments
To keep a track on the facebook comments and moderate it, you have to visit the Comment Moderation tool. Click on settings on the top right corner and edit it as per your choice.
Read More or Download this Blogger Template

    Recent Templates

    Recent Comments

    Video Guides