Blogger Store

Created for bloggers who want to start an e-commerce or shopping site, Blogger Store is a professional looking template compatible with Paypal or Google Checkout

  • Animated shopping cart
  • Dual dropdown menu bar
  • Automatic featured content carousel
  • Grid and list style post view
Blogger store shopping blogger template

Lightroom Photo Blog Template

A beautiful photo blog template that displays photos in gallery format and is available in two styles basic and advanced

  • Switchable background
  • Attractive theme font
  • Integrated social media icons
  • Left sidebar and navigation menu
Lightroom Photo Blog Template

Magpress

Magazine style theme adapted from wordpress

  • Featured slider section
  • Dual menu bar
  • Tabbed widget
  • 4 column footer
Magpress Magazine style Blog Template

Sens

A simple theme with a clean layout

  • Full width featured slider
  • 4 column footer
  • Social widgets integrated
Sens Blogger template

Pop Out Social Bookmarking Widget

A nice-looking pop out social bookmarking widget that allows readers to share their favorite post easily

  • Neat display
  • Easy to install
Add pop out social bookmarking widget for blogger

Add Pinterest 'Pin It' Button to Blogger Posts edit post

Posted by Bhavika On Monday, December 10, 2012 0 comments
add pinterest pin it button to blogger posts
Pinterest, the content-sharing pinboard style social network, is a great way to build traffic and get more people to visit your site. What better way than add Pinterest 'Pin It' button to your blog post.

I tried quite a few codes available on the net, and this one seemed to work well, the rest are either outdated and not working, or if the button works the image doesn't show up, so don't waste your time trying them out. The steps to add the Pin it button, with or without counter, to your blogger posts are mentioned below.

pinterest share button below blogger posts
Go to Template--Edit HTML, click on 'Expand Widget Templates' and look for this code, it generally appears twice so take the first one from top -
<data:post.body/>
Now paste the below code after it, if you want the button to appear on top of the post then insert this code above '<data:post.body/>' -
<!-- Pinterest button Start by BloggerSentral.com -->
<b:if cond='data:blog.pageType == &quot;item&quot;'>
<div id='pin-wrapper' style='margin:10px 10px 10px 0; text-align: left;'>
<a data-pin-config='beside' data-pin-do='buttonPin' expr:href='&quot;http://pinterest.com/pin/create/button/?url=&quot; + data:post.url'><img src='//assets.pinterest.com/images/pidgets/pin_it_button.png'/></a>
<span style='margin-left:-44px;'><a data-pin-config='beside' data-pin-do='buttonBookmark' href='//pinterest.com/pin/create/button/' style='outline:none;border:none;'/></span>
</div>
<script src='http://assets.pinterest.com/js/pinit.js' type='text/javascript'/>
</b:if>
<!-- Pinterest button End -->
In case the Pinterest script in the above code appears twice in your template, then delete this line from the code -
<script src='http://assets.pinterest.com/js/pinit.js' type='text/javascript'/>
pinterest button configuration
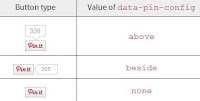
You can adjust the margin (marked in bold) so it fits in properly, you can change the positioning of the button as well, at present its 'beside' indicated in bold, you can change that.

Also the Pin it button can be aligned to 'right', 'center' or 'left' in the above code, change this part -
text-align: left;'

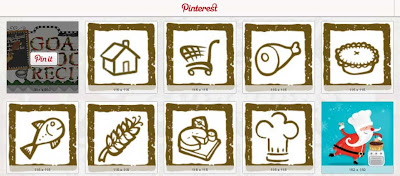
Save the changes and the Pin it button should appear in your blog posts. Once readers click on 'Pin It', they get to select which image to pin, if there are multiple images in your post.
pinterest select images to pin from blogger
Thanks to Green Lava for this useful tutorial.

VideoBox edit post

Posted by Bhavika On Tuesday, December 04, 2012 1 comments
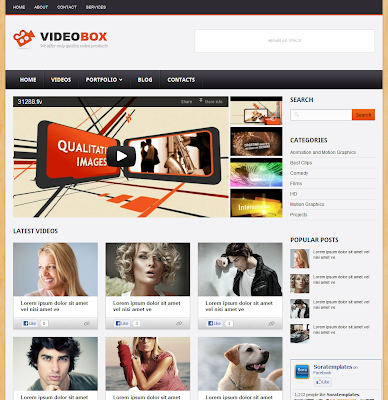
Video blogger templates have always been visually appealing. Another one to the list is Video Box, originally a wordpress theme and ported to blogger by Sora. VideoBox has dual menu bar with drop down, featured video slider, 4 column footer, header banner, page navigation widget and social media buttons in each post.
video blog template
Lets begin with the drop down menu bar, go to Edit html and search for this code -
<nav class='primary'>
<ul class='sf-menu' id='topnav'>
<li><a href='#'><span class='right'>Home</span></a></li>
<li><a href='#'><span class='right'>Videos</span></a></li>
<li><a href='#'><span class='right'>Portfolio</span></a>
<ul class='sub-menu'>
<li><a href='#'><span class='right'>Portfolio 1 col</span></a></li>
<li><a href='#'><span class='right'>Portfolio 2 cols</span></a></li>
<li><a href='#'><span class='right'>Portfolio 3 cols</span></a>
<ul class='sub-menu'>
<li><a href='#'><span class='right'>1st category</span></a></li>
<li><a href='#'><span class='right'>2nd category</span></a></li>
<li><a href='#'><span class='right'>3rd category</span></a></li>
</ul>
</li>
Add your categories etc, replace '#' with the links, and below 'sub menu' you add your sub-categories, you can also add sub sub-categories below 'Portfolio 3 cols', save the changes.

To modify the video slider, its pretty simple, search for this code -
<ul class='slides'>
<li class='item'>
<p><iframe frameborder='0' height='315' src='http://www.youtube.com/embed/Ok2VamxrYAY' width='560'/></p>
</li>

<li class='item'>
<p><iframe frameborder='0' height='315' src='http://www.youtube.com/embed/JitvT29fybE' width='560'/></p>
</li>
Replace the 'YouTube' video link, which you get from the embed code. If this your embed code, take only the link marked in bold -
<iframe width="420" height="315" src="http://www.youtube.com/embed/xdLNMEXWTL8" frameborder="0" allowfullscreen></iframe>
The second part of the code is below it, where you have to add the headline (indicated in bold) and post link (#).
<ul class='thumbs pagination'>
<li>
<span class='youtube-temp'/>
<span class='hover-bg'/>
<a class='title' href='#' rel='0'>Lorem ipsum dolor sit amet</a>
<a class='link' href='#'/>
</li>
<li>
<span class='youtube-temp'/>
<span class='hover-bg'/>
<a class='title' href='#' rel='1'>Fusce et lectus nec neque feugiat</a>
<a class='link' href='#'/>
</li>
The main column will display your latest posts with a facebook like button, so users can instantly share your content. Although when you click on the post, the video doesn't load on the home page, it takes you to the post page where you can watch the clip.

For the page navigation widget to function, you need to make a small change in the below code -
<script type='text/javascript'>//<![CDATA[
var posts=9,
num=2,
Change the number of posts in each page from '9' and '2' is the number of buttons will display.

Download the VideoBox Blogger Template

Replay edit post

Posted by Bhavika On Wednesday, November 21, 2012 0 comments
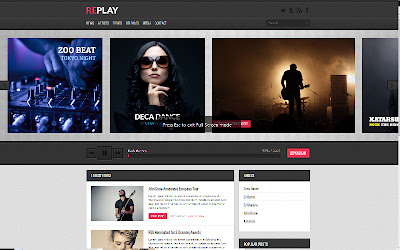
Replay is a 2 column wordpress theme converted to blogger by Sora. The template features content slider, right sidebar, social widget, drop down menu, HTML5 music player and page navigation widget.
Replay
To edit the menu bar, go to Edit Html and search for this code -
<div class='menu'>
<ul class='menu' id='menu-main-menu'>
<li><a href='#'>News</a>
<ul class='sub-menu'>
<li><a href='#'>Ribbon Slider</a></li>
<li><a href='#'>Fade Slider</a></li>
</ul>
</li>
<li><a href='#'>Artists</a></li>
<li><a href='#'>Events</a></li>
<li><a href='#'>Releases</a></li>
<li><a href='#'>Media</a>
<ul class='sub-menu'>
<li><a href='#'>Gallery</a></li>
<li><a href='#'>Videos</a></li>
<li><a href='#'>Dropdown</a>
<ul class='sub-menu'>
<li><a href='#'>Sample One</a></li>
<li><a href='#'>Sample Two</a></li>
<li><a href='#'>Sample Three</a></li>
</ul>
</li>
</ul>
</li>
<li><a href='#'>Contact</a></li>
</ul>
</div>
In the above code replace '#' with category links, change the category text, add sub-categories below 'sub-menu', and save the changes. Below it is the featured content slider, keep the image size 400px x 400px. Here is the code to look for in Edit Html -
<div class='ribbon-slide'>
<ul>
<li class='slide-400'><a href='#'>
<img class='fullwidth' height='400' src='https://lh6.googleusercontent.com/-756_uTFWSJM/UHt3i-lrg3I/AAAAAAAAEOs/CuETVL3Obso/s400/1.jpg' width='400'/> </a>
</li>
Replace '#' with the post urls, add the image links and follow the same steps for all the slides. In case you want to add captions for each image then insert this code after '</a>' for each slide.
<div class='ribbon-caption'>
<a class='ribbon-caption-title' href='#'>
<span>Ozone world tour started</span>
An interesting part of this theme is the music player, so your readers can listen to some music while browsing your content. Look for this code in Edit Html and change song.mp3 and Song Title to your favorite tunes -
<div class='playlist'>
<a href='/song1.mp3'>Song Title 1</a>
<a href='/song2.mp3'>Song Title 2</a>
</div>
To configure the social widget in the header, search for this code in Edit Html -
<div class='social-links'>
<a class='facebook' href='#' target='_blank' title='Facebook'/>
<a class='rss' expr:href='data:blog.homepageUrl + &quot;feeds/posts/default&quot;' target='_blank' title='Rss'/>
<a class='tumblr' href='#' target='_blank' title='Tumblr'/>
<a class='twitter' href='#' target='_blank' title='Twitter'/>
</div>
Add your social ids (marked in bold) and save the changes. The page navigation widget has to be configured as well, in the below code the first option shows 'number of posts in each page' and the second one shows 'number of buttons will display', change it as per your choice.
<script type='text/javascript'>//<![CDATA[
var posts=5,
num=2,
Download Replay Blogger Theme

Monaco Blogger Theme edit post

Posted by Bhavika On Wednesday, November 07, 2012 0 comments
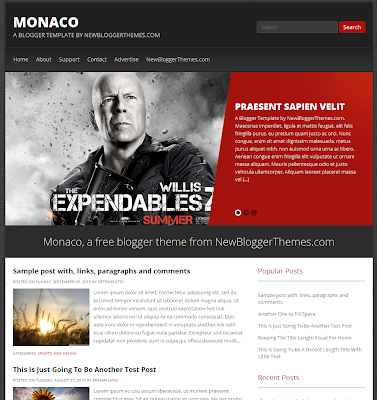
Monaco is a 2 column wordpress theme converted to blogger by New Blogger Themes. It has a nice slider, horizontal menu bar and 3 column footer.
Monaco Blogger Theme
Lets begin with the menu bar, to add links go to 'Layout', click on edit link of 'Edit This Menu' widget, and save. Moving on to the slider, modify the default content in Edit Html, search for this code -
<ul class='slides'>

<li>
<a href='ENTER-SLIDE-1-LINK-HERE'><img class='slide-image' src='http://1.bp.blogspot.com/-wItf03wL5kQ/UHJZ1PGpGpI/AAAAAAAAHWc/8x1W2gpri44/s1600/slide1-600x400.jpg'/></a>
<div class='flex-caption'>
<h3>Praesent sapien velit</h3>
<p>A Blogger Template by NewBloggerThemes.com. Maecenas imperdiet, ligula et mattis feugiat, elit felis fringilla purus, eu pretium quam justo ac orci. Nunc congue, enim sit amet dignissim malesuada, metus purus aliquet nibh, non euismod urna urna ac libero. Aenean congue enim fringilla elit vulputate ut ornare massa aliquam. Mauris pellentesque odio et justo vehicula ullamcorper. Aliquam laoreet placerat massa vel [...]</p>
</div>
</li>
Enter the post link (as mentioned in the code), add the image url, keep the image size 600px × 400px, add post title and few lines of description. You have to follow the same steps for the remaining slides and save the changes. Below the slider you can add one line intro text to your blog, to change the default line look for this code -
<div class='intro-text'>
Monaco, a free blogger theme from NewBloggerThemes.com
</div>
The main column shows posts in the standard summary format with thumbnail. The single sidebar on the right and 3 column footer will show your different widgets and content.

Download Monaco Blogger Theme

Insomnia Blogger Template edit post

Posted by Bhavika On Monday, October 08, 2012 0 comments
Insomnia is a 2 column wordpress theme converted to blogger by Sora Templates. The template includes dual menu bar, featured content slider, 3 columns footer and social sharing widget.
Insomnia Blogger Template
The topmost menu bar shows page links automatically, while the second menu bar with dropdown can be configured from Edit Html -
<div class='menu'>
<ul class='fadein drop' id='menu-main-nav'>
<li><a href='#'>Blog</a>
<ul class='sub-menu'>
<li><a href='#'>Entertainment</a></li>
<li><a href='#'>Politics</a></li>
<li><a href='#'>Technology</a></li>
<li><a href='#'>Social Media</a></li>
</ul>
</li>
<li><a href='#'>Content Styling</a></li>
<li><a href='#'>Page Templates</a>
<ul class='sub-menu'>
<li><a href='#'>Sitemap</a></li>
<li><a href='#'>Archives</a></li>
<li><a href='#'>Contact Form</a></li>
<li><a href='#'>Full Width</a></li>
<li><a href='#'>Left Sidebar</a></li>
</ul>
</li>
In the above code replace '#' with the relevant category links, add your main categories and the sub-categories will appear under 'sub-menu', once done save the changes.

To configure the featured content slider find this code in Edit Html and make the changes -
<div class='viewport'>
<ul class='overview'>
<li class='featured-post col g4'>
<a class='dt-thumb' href='#'><img class='dt-post-image thumbnail' height='225' src='https://lh4.googleusercontent.com/-M9mBT7LYI4E/UEAmmHhDlPI/AAAAAAAADaM/gLjQ6KZRiMY/s300/1.jpg' width='300'/></a>
<div class='post-info'>
<h2 class='entry-title'><a href='#'>Under Lights in Astoria</a></h2>
</div>
</li>
Keep the image size 300px × 225px, add the image url, replace '#' with post link, add post title, and follow the same steps for all the slides. Your latest posts will be neatly displayed in the main column, and the post page has the social media icons and a comment form integrated in it.

The single sidebar and footer can be used to display popular posts, archives, recent comments, blogroll etc.

Download Insomnia Blogger Template

Galauness, a Minimalist Blogger Template edit post

Posted by Bhavika On Monday, October 01, 2012 0 comments
Galauness is a clean, minimalist 3 column blogger template created by Iksandi. The template includes neat display of post images with cool hover on effects, custom 404 error page and custom lightbox, related posts articles and social media buttons, 3 column footer and is available in two background colours - white and black.
Galauness, a minimalist clean blogger template
You can begin by configuring the social media links above the header, search for this code in Edit Html and add your account ids -
<a expr:href='data:blog.homepageUrl + &quot;feeds/posts/default&quot;'>Feed</a>
</li>
<li class='icon-facebook'>
<a href='http://facebook.com'>Facebook</a>
</li>
<li class='icon-twitter'>
<a href='http://twitter.com'>Twitter</a>
</li>
<li class='icon-gplus'>
<a href='https://plus.google.com'>GPlus</a>
</li>
<li class='icon-youtube'>
<a href='http://youtube.com'>Youtube</a>
</li>
<li class='icon-flickr'>
<a href='http://flickr.com'>flickr</a>
</li>
<li class='icon-lastfm'>
<a href='http://last.fm'>Last.fm</a>
</li>
<li class='icon-instagram'>
<a href='http://instagr.am'>Instagram</a>
</li>
<li class='icon-skype'>
<a href='http://www.skype.com'>Skype</a>
</li>
Next is the top navigation bar, find this code in Edit Html and make the changes -
<!-- Start - Navigation Menu -->
<div class='nav'>
<ul class='menu' id='menu'>
<li><a expr:href='data:blog.homepageUrl'>home</a></li>
<li><a class='drop-ctg' href='#'>category</a>
<ul>
<li><a href='#'>Category 1</a></li>
<li><a href='#'>Category 2</a></li>
<li><a href='#'>Category 3</a></li>
<li><a href='#'>Category 4</a></li>
</ul>
</li>
<li><a href='#'>Menu 1</a></li>
<li><a href='#'>Menu 2</a></li>
<li><a href='#'>Menu 3</a></li>
<li><a href='#'>Menu 4</a></li>
<li><a expr:href='data:blog.homepageUrl + &quot;404&quot;'>404 Error Page</a></li>
</ul>
</div>
<!-- End - Navigation Menu -->
Replace '#' with the category links, add sub-categories and save the changes. The main column shows the post images, text and comment on hover, its a lovely effect to have on blogger.

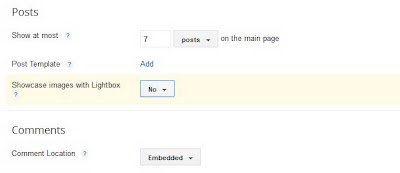
You also need to configure the post date from Settings--Language and formatting, change the Date Header Format and Timestamp Format, this step has to be done in order to avoid any errors. Also make sure you have disabled lightbox and comment form is embedded below post in Settings--Posts and comments, as shown in the image below.
galauness blogger template comment and lightbox setting
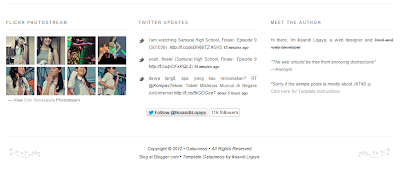
The footer also includes several features, like putting up your flickr stream. In order to activate that, paste this code in Layout--Add a gadget and add your flickr username (marked in bold) -
<script src=”http://www.flickr.com/badge_code_v2.gne?count=8&display=latest&size=s&layout=x&source=user&user=USERNAME” type=”text/javascript”></script>
Galauness minimalist clean blogger template footer
Next to Flickr you can also show your latest twitter updates, add the below code in Layout--Add a gadget and change Username with your twitter handle -
<div id=”twitter_div”>
<ul id=”twitter_update_list”></ul>
</div>
<script src=”http://twitter.com/javascripts/blogger.js” type=”text/javascript”></script>
<script src=”http://twitter.com/statuses/user_timeline/USERNAME.json?callback=twitterCallback2&amp;count=3&#8243; type=’text/javascript’></script>
Download Galauness Blogger Template

eSpecial Blogger Theme edit post

Posted by Bhavika On Thursday, September 06, 2012 1 comments
eSpecial is a premium wordpress theme converted to blogger by Sora. Its a 2 column template with a beautiful slider, single menu bar with dropdown, 3 columns footer and page navigation widget already installed.
eSpecial Blogger Theme
The menu bar has to be configured in Edit Html, find the below code -
<div class='menu-main-navigation-container'>
<ul class='s-menu' id='menu-main-navigation'>
<li><a href='#'>Home</a>
<ul class='sub-menu'>
<li><a href='#'>Home page layout 2</a></li>
</ul>
</li>
<li><a href='#'>Sliders</a>
<ul class='sub-menu'>
<li><a href='#'>Image Slider 1</a></li>
<li><a href='#'>Image Slider 2</a></li>
<li><a href='#'>Video Slider 3</a></li>
<li><a href='#'>Accordion Slider</a></li>
</ul>
</li>
Replace '#' with menu item links, add the categories and sub-categories, save the changes. For the featured content slider, there are two parts of the code which needs to be modified, look for this code for the first slide -
<div class='lof1_featured'/>
<ul class='lof1-main-wapper'>
<li><a href='#'><img src='https://lh3.googleusercontent.com/-F5Bd9WJ9AG0/UDrbcE-Yv4I/AAAAAAAADTg/vZgFhMfHwn4/s960/1.jpg'/></a>
<div class='lof1-main-item-desc'>
<div class='lof1-main-item-title'>
<h2><a href='#'>Professional Business &amp; Portfolio Theme</a></h2></div>
<p>Lorem ipsum dolor sit amet, consectetur adipiscing elit.</p>
</div>
</li>
Replace '#' with featured post url, add the image url, keep the size 960px × 290px, add the post title followed by a short post summary. Repeat the same step for the remaining 4 slides. Now look for this code in Edit Html -
<div class='lof1-navigator-outer'>
<ul class='lof1-navigator'>
<li><img src='https://lh3.googleusercontent.com/-nzYyX02VjM4/UDrY3MagHdI/AAAAAAAADSs/gIElsx8-6gM/s158/1.jpg'/></li>
This is where you have to add the thumbnail version for each slide, the image size should be 158px × 102px, add the image url for all the slides and save the changes.

The main column shows the post summary with an image and date, which you have to configure in Settings--Language and Formatting, change the Timestamp Format, language and date header format, this has to be done to avoid the undefined error on the home page.

For the page navigation widget to function properly, search for this code -
<script type='text/javascript'>//<![CDATA[
var posts=4,
num=2,
Change the number of posts in each page from 4 to your current setting, and '2' is the number of buttons to display. The sidebar is on the left and you can display link lists, tags, popular posts, comments etc.

Download eSpecial Blogger Theme

Johny Magazine Blogger Template edit post

Posted by Bhavika On Monday, September 03, 2012 0 comments
Johny Kenthir is a 4 column magazine style blogger template created by Maskolis. The theme is suitable for a news blog, as it includes several features like dual menu bar with dropdown, automatic featured content slider, automatic recent per category, 3 column footer, tab view of categories, automatic slider carousel, ads ready, pagination integrated and more.
johny kenthir banget magazine blogger template
johny magazine blogger template video tabber
Let's start with modifying the theme, for the first navigation bar, find this code -
<ul id='menubar'>
<li><a href='/'><img border='0' src='http://1.bp.blogspot.com/-hOrRvLeBQYM/T_WSzbGC7vI/AAAAAAAAHPw/S_2CUG0zZhk/s1600/home_white.png' style='padding:0px;'/></a></li>
<li><a href='#'>About Us</a></li>
<li><a class='trigger' href='#'>Contact Us</a>
<ul>
<li><a href='#'>Goggle +</a></li>
<li class='hr'/>
<li><a href='#'>Contact on Facebook</a></li>
<li class='hr'/>
<li><a href='#'>Contact on Twitter</a></li>
</ul>
</li>
<li><a href='#'>Sport</a></li>
<li><a href='http://creatingwebsite-maskolis.blogspot.com/2012/07/johny-kenthir-template-ramai-seperti.html'>Instruction to use</a></li>
Add your links after '<a href="' and the corresponding categories, for example - below 'Contact us' you can add sub-categories, so below 'ul' you can add sub-sections/categories etc. Right below the first menu bar is the second bar which automatically displays pages.

The carousel below the menu bar updates automatically once you have 4 or more posts. While the slider in the main column shows articles as per the selected label, you need to paste the below code in Layout, click edit 'HTML/javascript' gadget -

<div id='featuredContent'>
<div class='sliderwrapper' id='featured-slider'>
<script>
document.write("<script src="/feeds/posts/default/-/sport?max-results="+numposts3+"&orderby=published&alt=json-in-script&callback=showrecentposts3"></script>");
</script>
</div>
<div id='paginate-featured-slider'>
<ul>
<script>
document.write("<script src="/feeds/posts/default/-/sport?max-results="+numposts3+"&orderby=published&alt=json-in-script&callback=showrecentposts4"></script>");
</script>
</ul>
<div class='clear'></div>
</div>
<script type='text/javascript'>
featuredcontentslider.init({
id: "featured-slider", //id of main slider DIV
contentsource: ["inline", ""], //Valid values: ["inline", ""] or ["ajax", "path_to_file"]
toc: "markup", //Valid values: "#increment", "markup", ["label1", "label2", etc]
nextprev: ["", ""], //labels for "prev" and "next" links. Set to "" to hide.
revealtype: "mouseover", //Behavior of pagination links to reveal the slides: "click" or "mouseover"
enablefade: [true, 0.4], //[true/false, fadedegree]
autorotate: [true, 5000], //[true/false, pausetime]
onChange: function(previndex, curindex){ //event handler fired whenever script changes slide
//previndex holds index of last slide viewed b4 current (1=1st slide, 2nd=2nd etc)
//curindex holds index of currently shown slide (1=1st slide, 2nd=2nd etc)
}
})
</script>
</div>
Change the label (marked in bold) with the one you want to display and also the number of posts (marked in bold) to show in the slider. Adjacent to the slider, the latest posts are shown from the blog feed along with page navigation widget.

This template also includes the 'video category' widget, that will display your latest video posts. To get it working, go to Layout, click on edit 'Video category', put in the desired label and save. Now get the embed code from YouTube, insert it in the post along with this line of code (in bold). It should look like this -

<iframe width="560" height="315" src="http://www.youtube.com/embed/5pHbzBH3KxQ" frameborder="0" allowfullscreen></iframe><img border="0" height="0" width="0" src="http://i2.ytimg.com/vi/5pHbzBH3KxQ/0.jpg" />
Also ensure that you change the serial number in the above code (5pHbzBH3KxQ) in italics, and publish the post.

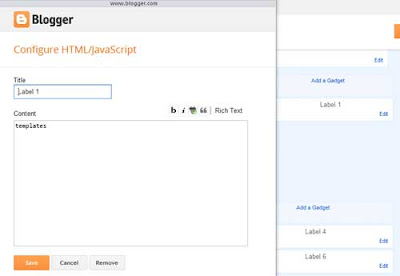
Besides the video section, you can show posts by another label as well, go to Layout, edit Label 1, put in the label and save the changes.
johny kenthir insert label widget
Johny Kenthir theme is extremely useful if you have lot of content, another way of showing posts per label is in tabbed format. To get that working, search for the following code in Edit Html and replace the labels -
Title1="DIARY";Title2="JAZZ";Title3="HEALTH";Title4="SPORT";Title5="COMEDY";
The next step is to search for this code, click on 'Expand widget' and add the labels (as indicated in bold) -

<div class='tab-wrapper'>
<div class='tabber' id='tab1'>
<script>
document.write(&quot; &lt;script src=&quot;/feeds/posts/default/-/sport?max-results=&quot;+numposts9+&quot;&amp;orderby=published&amp;alt=json-in-script&amp;callback=showrecentposts9&quot;&gt;&lt;/script&gt;&quot;);
</script></div>
<div class='tabber' id='tab2'>
<script>
document.write(&quot; &lt;script src=&quot;/feeds/posts/default/-/sport?max-results=&quot;+numposts9+&quot;&amp;orderby=published&amp;alt=json-in-script&amp;callback=showrecentposts9&quot;&gt;&lt;/script&gt;&quot;);
</script></div>
<div class='tabber' id='tab3'>
<script>
document.write(&quot; &lt;script src=&quot;/feeds/posts/default/-/sport?max-results=&quot;+numposts9+&quot;&amp;orderby=published&amp;alt=json-in-script&amp;callback=showrecentposts9&quot;&gt;&lt;/script&gt;&quot;);
</script></div>
<div class='tabber' id='tab4'>
<script>
document.write(&quot; &lt;script src=&quot;/feeds/posts/default/-/comedy?max-results=&quot;+numposts9+&quot;&amp;orderby=published&amp;alt=json-in-script&amp;callback=showrecentposts9&quot;&gt;&lt;/script&gt;&quot;);
</script></div>
<div class='tabber' id='tab5'>
<script>
document.write(&quot; &lt;script src=&quot;/feeds/posts/default/-/jazz?max-results=&quot;+numposts9+&quot;&amp;orderby=published&amp;alt=json-in-script&amp;callback=showrecentposts9&quot;&gt;&lt;/script&gt;&quot;);
</script></div>
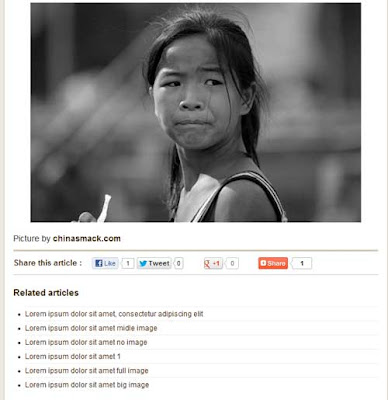
Add the labels for all the tabs, and save the changes. Each post includes the social media sharing widget, and also the' Related posts' widget, so you don't need to bother of adding it manually.
related posts widget in magazine blogger template
Next you can customise the sidebar and footer columns by adding various blogger widgets. Its a very professional-looking theme with excellent features, so you won't miss out on showing your top content.

Download the Johny Magazine Blogger Template

Tarnished Blogger Template edit post

Posted by Bhavika On Sunday, August 26, 2012 0 comments
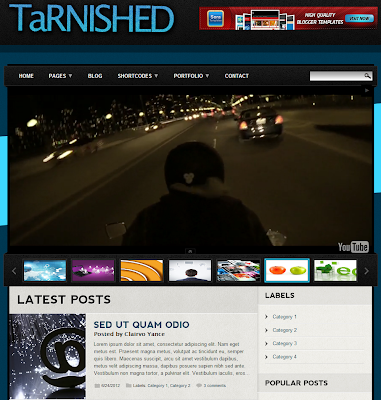
Tarnished is a premium wordpress theme converted to blogger by Sora. Its a lovely template including featured image and video slider, navigation bar with drop down, page navigation widget, header banner, 4 column footer and social bar.
Tarnished Blogger Template
For the header banner, look for the following code in Edit Html and replace it with yours, banner size must be 468px × 60px -
<a href='#'><img border='0' src='https://lh4.googleusercontent.com/-QK4ioBrZVWw/T-mvQaKJcrI/AAAAAAAABqE/S5WRkYbwMrM/s468/banner.jpg'/></a>
To edit the menu bar, go to Edit Html and search for this code -
<div id='menu'>
<ul class='menu' id='menu-header'>
<li><a href='#'>Home</a></li>
<li><a href='#'>Pages</a>
<ul class='sub-menu'>
<li><a href='#'>Page With Left Sidebar</a></li>
<li><a href='#'>Page With Right Sidebar</a></li>
<li><a href='#'>Full Width Page</a></li>
</ul>
</li>
You have to replace '#' with the relevant category links, add the categories, under 'sub-menu' you can add your sub-categories etc. Moving on to the featured content slider, this is the code you have to look for in Edit Html -
<div class='slider' id='slideshow' style='width: 950px; height: 450px;'>

<div class='slide' style='width: 950px; height: 450px;'>
<div class='caption-overlay caption-bottomright caption-dark'>
<h2>Nunc arcu ipsum</h2></div>
<img class='slider-image' src='https://lh3.googleusercontent.com/-3cKIzkdN4NM/T-kU5-Y-PvI/AAAAAAAABhw/SHdIJO6ewVI/s1600/1.jpg' style='width: 950px; height: 450px;'/>
</div>

<div class='slide' style='width: 950px; height: 450px;'>
<div class='caption-frame caption-right caption-light' style='width: 275px; height: 408px;'>
<h2>Faucibus felis</h2>
<p>Lorem ipsum dolor sit amet, consectetur adipiscing elit. Fusce nec consectetur nibh. Nulla facilisi. Vestibulum non ullamcorper arcu. Mauris pellentesque consequat justo, eget pellentesque odio ullamcorper eu. Ut neque ligula, mollis quis hendrerit ac, ullamcorper et augue. Vivamus auctor faucibus felis in porta. Sed ac lorem ligula, et auctor sapien.</p></div>
<img class='slider-image' src='https://lh3.googleusercontent.com/-LB_cw1UEW7w/T-kU5YgAFjI/AAAAAAAABhs/QdwPHOrxheo/s633/2.jpg'/>
</div>
You have to add the post title between '<h2> ......</h2>' replace the jpg link with your image url, and add post description between '<p>.....</p>', repeat the steps in all the slides, except in case of a video slide, this is the code you have to look for in Edit Html, its below the above code -
<div class='slide-video' style='width: 950px; height: 450px;'>
<div id='fadeslider-video-2305'/>
<script>
jwplayer(&quot;fadeslider-video-2305&quot;).setup({
file: &quot;http://www.youtube.com/watch?v=L9szn1QQfas&amp;hd=1&quot;,
image: &quot;https://lh6.googleusercontent.com/-HNgrRmwWmGE/T-kU7FHwFMI/AAAAAAAABiM/wvXOgwMHDoU/s1600/6.jpg&quot;,
Add your YouTube video link (marked in bold), replace the image link (in bold), and save the changes.
Keep the image size 950 px x 450 px if you want to put up a full-width image without description and post title, if you want to add a description and post title then keep the image size 633px × 450px. Below the main slider is thumbnail version of the same slider, you have to upload the thumbnail images for the same. You have to find the below code, simply replace the image urls (in bold) in each slide, thumbnail size must be 109 px x 54 px -
<span class='slider-button'>
<img src='https://lh3.googleusercontent.com/-3cKIzkdN4NM/T-kU5-Y-PvI/AAAAAAAABhw/SHdIJO6ewVI/s109-p/1.jpg' style='width: 109px; height: 54px;'/>
</span>

<span class='slider-button'>
<img src='https://lh3.googleusercontent.com/-LB_cw1UEW7w/T-kU5YgAFjI/AAAAAAAABhs/QdwPHOrxheo/s109-p/2.jpg' style='width: 109px; height: 54px;'/>
</span>
The latest posts neatly displays in summarised format with labels, date and comments. The page navigation widget at the bottom of the main column has to be configured, search for the below code, and change the number of posts -
var pages=4, (Number of posts in each page)
num=2, (Number of buttons will display)
The social media widget is above the footer, you can add your profile links, RSS and mail id in the below code -
<div id='social'>
<a expr:href='data:blog.homepageUrl + &quot;feeds/posts/default&quot;'><img src='https://lh5.googleusercontent.com/-m2Lyqvhjo6A/T-mgxCnjBxI/AAAAAAAABmw/MiA5MD7u1nc/s32/rss.png'/></a>
<a href='mailto:#'><img src='https://lh6.googleusercontent.com/-kwG9xymLVOo/T-mgwbV3vbI/AAAAAAAABmk/ZFHcRF0M_ro/s32/gmail.png'/></a>
<a href='https://twitter.com'><img src='https://lh4.googleusercontent.com/-3s2FTzN7-Xo/T-mg4jdsDJI/AAAAAAAABoA/xj-dlmEAaDY/s32/twitter.png'/></a>
<a href='http://www.facebook.com'><img src='https://lh3.googleusercontent.com/-VlGeEI8v-0M/T-mgt8L2hVI/AAAAAAAABmA/IvfGW-aJ2yw/s32/facebook.png'/></a>
<a href='http://www.flickr.com'><img src='https://lh6.googleusercontent.com/-2xEP8QwYI0g/T-mguHM4MyI/AAAAAAAABmE/us0gLOIpXaw/s32/flickr-2.png'/></a>
<a href='http://vimeo.com'><img src='https://lh6.googleusercontent.com/-5x8YuDDlY0c/T-mg5Z5HqJI/AAAAAAAABoM/67duTxK_124/s32/vimeo.png'/></a>
</div>
The footer can be modified from Layout-edit Page Elements and show different blogger widgets.
Download Tarnished Blogger Template

Unite Blogger Template edit post

Posted by Bhavika On Friday, August 24, 2012 0 comments
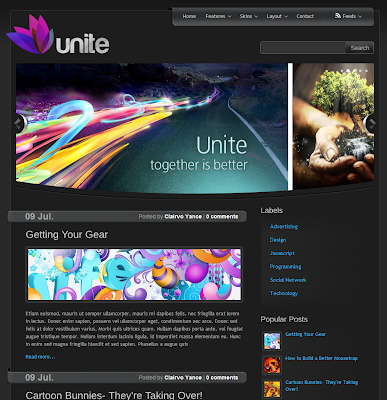
Unite Blogger Template is a 2 column wordpress theme converted by Sora templaes. Its a lovely template, compact and clean layout with featured content slider, 3 column footer, light and dark background available and social media icons.
Unite Blogger Template
The single menu bar on top includes dropdown option, to modify it, go to Edit Html and find this code -
<div id='MainMenu'>
<div id='MmLeft'/>
<div id='MmBody'>
<ul class='menu'>
<li class='current'><a expr:href='data:blog.homepageUrl'>Home</a></li>
<li> <a href='#'>Features</a>
<ul>
<li><a href='#'>Home page</a>
<ul>
<li><a href='#'>Home 1</a></li>
<li><a href='#'>Home 2</a></li>
<li><a href='#'>Home 3</a></li>
</ul>
</li>
<li><a href='#'>Portfolio</a></li>
<li><a href='#'>Blog</a></li>
<li><a href='#'>Text Styles</a></li>
<li><a href='#'>About the Theme</a></li>
</ul>
Replace 'features' with your main category, under that you can add sub-categories, or even sub sub-categories below 'Home page'. The menu bar also includes subscribe to feed, facebook and twitter accounts. You need to add the links to your social profiles or page, simply search for this code in Edit Html and make the changes -
<li><a href='http://www.facebook.com/'><span class='mmFacebook'>Facebook</span></a></li>
<li><a href='https://twitter.com'><span class='mmTwitter'>Twitter</span></a></li>
Moving on to the slider, find this code in Edit Html -
<div id='Slider'>
<a href='http://www.soratemplates.com'><img alt='Slide 1' height='341' src='https://lh4.googleusercontent.com/-3X1c4AxpD1E/T_vqAuN65zI/AAAAAAAACMY/_90diSpJDqQ/s1600/slide-1.jpg' width='948'/></a>
Change the post url, add alt text and image link, follow the same steps for all the slides and save the changes. Keep the image size 948px by 341px.

The main column neatly displays post summary with author name, comments and labels. You will also have to change the date format from Settings--Language and Formatting, go to Date Header Format and timestamp format, this will have to be done to avoid the 'undefined' error.

You can use the single sidebar on the right and the footer to display various blogger widgets like Contact, archives, popular posts and so on.

Download Unite Dark Blogger Template

Download Unite White Blogger Template

NewsPlus Blogger Template edit post

Posted by Bhavika On Friday, August 17, 2012 0 comments
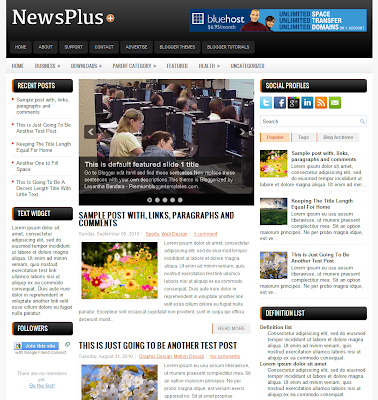
NewsPlus is a magazine style 3 column blogger template ported from wordpress by Lasantha. It includes a featured content slider, dual navigation bar with dropdown option, tabbed widget.
NewsPlus magazine Blogger Template
Let's begin with the header section, replace the blog logo from layout, click on edit 'header' and upload your logo, keep the image size 270px width and 42px height. Moving o nto the menu bar, the first menu shows pages automatically once you have published them. For the second bar, look for the below code in Edit Html -
<ul class='menus menu-secondary'>

<li><a expr:href='data:blog.homepageUrl'>Home</a></li>

<li><a href='#'>Business</a>
<ul class='children'>
<li><a href='#'>Internet</a></li>
<li><a href='#'>Market</a></li>
<li><a href='#'>Stock</a></li>
</ul>
</li>

<li><a href='#'>Downloads</a>
<ul class='children'>
<li><a href='#'>Dvd</a></li>
<li><a href='#'>Games</a></li>
<li><a href='#'>Software</a>
<ul class='children'>
<li><a href='#'>Office</a>
</li>
</ul>
</li>
In the above code replace '#' with the relevant links, change the default categories like 'Business', 'Download' etc., you can also put in sub-categories under 'ul class=children' like under 'Software' category, make changes in the subsequent code in Edit html and save.

Moving on to the featured content slider, search for this code in Edit Html, which is for the first slide -

<!-- Featured Content Slider Started -->

<b:if cond='data:blog.pageType != &quot;static_page&quot;'>
<b:if cond='data:blog.pageType != &quot;item&quot;'>

<div class='fp-slider clearfix'>
<div class='fp-slides-container clearfix'>

<div class='fp-slides'>

<!-- Slide 1 Code Start -->
<div class='fp-slides-items'>
<div class='fp-thumbnail'>
<a href='#'><img src='http://4.bp.blogspot.com/-_27tWoeRYpI/UB8q2eXYzrI/AAAAAAAAGvE/WuGp4wIREH4/s1600/1.jpg'/></a>
</div>
<div class='fp-content-wrap'>
<div class='fp-content'>
<h3 class='fp-title'>
<a href='#'>This is default featured slide 1 title</a>
</h3>
<p>
Go to Blogger edit html and find these sentences.Now replace these sentences with your own descriptions.This theme is Bloggerized by Lasantha Bandara - Premiumbloggertemplates.com.
</p>
</div>
<div class='fp-prev-next-wrap clearfix'>
<a class='fp-next' href='#fp-next'/>
<a class='fp-prev' href='#fp-prev'/>
</div>
</div>
</div>
<!-- Slide 1 Code End -->
Replace '#' with post link, add the image url, post title and description as indicated in the code, follow the same steps for all the slides and save the changes.

The two sidebars are on either side of the main column, you can add different widgets of your choice. To change the default name of the tabbed widget, look for this code and change the text marked in bold -
<ul class='tabs-widget tabs-widget-widget-themater_tabs-1432447472-id'>
<li><a href='#widget-themater_tabs-1432447472-id1'>Popular</a></li>
<li><a href='#widget-themater_tabs-1432447472-id2'>Tags</a></li>
<li><a href='#widget-themater_tabs-1432447472-id3'>Blog Archives</a></li>
</ul>
The theme also includes social media icons and search box in the sidebar.

Download the NewsPlus Blogger Template

Blue Travel Blogger Theme edit post

Posted by Bhavika On Wednesday, August 08, 2012 0 comments
Blue Travel is a 2 column travel-based template designed by Lasindu Nadishan. It includes a slider, dual navigation bar, social media and popular posts widget and 3 column footer.
Blue Travel Blogger Theme
Let's begin with the top menu bar, go to Edit Html and look for the below code -
<div class='menu-main-container'><ul class='menu' id='menu-main'><li class='menu-item menu-item-type-custom menu-item-object-custom current-menu-item current_page_item menu-item-home menu-item-244' id='menu-item-244'><a href='/'>Home</a></li>
<li class='menu-item menu-item-type-taxonomy menu-item-object-category menu-item-187' id='menu-item-187'><a href='#'>Movies</a></li>
<li class='menu-item menu-item-type-taxonomy menu-item-object-category menu-item-188' id='menu-item-188'><a href='#'>Technology</a></li>
<li class='menu-item menu-item-type-taxonomy menu-item-object-category menu-item-189' id='menu-item-189'><a href='#'>Games</a></li>

<li class='menu-item menu-item-type-taxonomy menu-item-object-category menu-item-190' id='menu-item-190'><a href='#'>Music</a></li>
<li class='menu-item menu-item-type-taxonomy menu-item-object-category menu-item-191' id='menu-item-191'><a href='#'>Fashion</a></li>
<li class='menu-item menu-item-type-custom menu-item-object-custom menu-item-224' id='menu-item-224'><a href='#'>Pages</a>
<ul class='sub-menu'>
<li class='menu-item menu-item-type-post_type menu-item-object-page menu-item-225' id='menu-item-225'><a href='#'>Full Width Page</a></li>
Replace '#' with category links, add the corresponding categories, you can also add sub-categories below 'Pages', and save the changes.

The slider has a cascading effect, and the image loads up on hovering over it, to modify the slider, go to Edit Html and look for this code -
<span class='fadeout'/>
<div class='excerpt'>
<h2><a href='http://www.coolbthemes.com/' rel='bookmark' title='Permanent Link to Quas molestias excepturi'>Quas molestias excepturi</a></h2>
</div>
<img alt='Quas molestias excepturi' height='305' src='http://1.bp.blogspot.com/-JAUFaSLtHpE/Tq6tMelbgkI/AAAAAAAAFV4/1R6uOVxZL8o/s1600/4.jpg' width='600'/>
</li>
<li id='kwick_2'>
<span class='fadeout'/>
<div class='excerpt'>
<h2><a href='http://www.coolbthemes.com/' rel='bookmark' title='Permanent Link to Impedit quo minus id'>Impedit quo minus id</a></h2>
</div>
<img alt='Impedit quo minus id' height='305' src='http://1.bp.blogspot.com/-NpQcZwnHVQg/Tq6tMBE4s6I/AAAAAAAAFVs/esA9aBxEk30/s1600/3.jpg' width='600'/>
</li>
Replace the default links with the post urls, add title text, post title, img alt text and the image url, follow the same steps for the remaining slides. Make sure the image size is 600p×305px. Below the slider is the second menu bar, change the links from Edit Html, look for the following code -
<div id='navigation2'>
<ul class='menu' id='dropmenu'><li id='home'><a href='#'>Home</a></li><li class='menu-item menu-item-type-taxonomy menu-item-object-category menu-item-254' id='menu-item-254'><a href='#'>Business</a>
<ul class='sub-menu'>
<li class='menu-item menu-item-type-taxonomy menu-item-object-category menu-item-255' id='menu-item-255'><a href='#'>Cell Phones</a></li>

<li class='menu-item menu-item-type-taxonomy menu-item-object-category menu-item-256' id='menu-item-256'><a href='#'>Movies</a>
<ul class='sub-menu'>
<li class='menu-item menu-item-type-taxonomy menu-item-object-category menu-item-257' id='menu-item-257'><a href='#'>News</a></li>
You have to follow the same steps as the first menu bar, replace '#' with your links and add sub-category links under the default 'Business' category, here you could also add sub sub-menu under the default category 'Movies', save the changes.

The main column shows the summarised version of the posts with thumbnails and tags. While the sidebar is on the left where you can display different blogger widgets.

Download the Blue Travel Blogger Theme

White Blogger Template edit post

Posted by Bhavika On Monday, August 06, 2012 4 comments
Putih Pekat or White is a 2 column blogger theme designed by Iksandi. It has a clean, minimalist layout featuring popular posts widget with sliding effect and post summary, related posts widget, and 3 column footer.
White clean Blogger Template
The horizontal menu bar picks up page links and shows automatically. The slider displays the popular posts with short brief linking to the post, this too is automatic. Whereas in the main column each post image shows up with summary and 'Read more' link.

There is additional space in the footer that includes twitter updates, About me and video section. To change the twitter setting, go to Layout, edit 'Twitter update' gadget and add the below code, don't forget to add your twitter handle as mentioned -
<div id=”twitter_div”>
<ul id=”twitter_update_list”></ul>
</div>
<script src=”http://twitter.com/javascripts/blogger.js” type=”text/javascript”></script>
<script src=”http://twitter.com/statuses/user_timeline/YOUR-TWITTER-USERNAME.json?callback=twitterCallback2&amp;count=3&#8243; type=’text/javascript’></script>
Adjacent to it you can upload your favorite video, just add the embed code in Layout--click on edit 'Video widget' and paste, you must use 480px YouTube video.

The 3 column footer includes the search box, follow blog by email option - for which you have to insert your feedburner url from layout - blog roll, quotes etc.

Download the White Blogger template

Sporty Magazine 2 Blogger Template edit post

Posted by Bhavika On Thursday, July 26, 2012 1 comments
Sporty magazine 2 is a 3 column sports blogger template created by Borneo Templates. Its a professional theme with dropdown menu bar, featured slideshow, news ticker, twitter widget, 5 column footer and social bookmarking icons on post pages.
sporty magazine football blogger template
Lets start with the menu bar, search for the below code in Edit Html and change the links -
<div id='menuwrapper'>
<ul id='menubar'>
<li class='selected'><a href='/'><img border='0' src='http://1.bp.blogspot.com/-7Eveg1Sruok/TZE6GFV_OHI/AAAAAAAABZo/jRHomtpFbd0/s1600/home_white.png' style='padding:0px;'/></a></li>
<li class='selected'><a href='#'>About Us</a></li>

<li><a class='trigger' href='#'>Contact Us</a>
<ul>
<li><a href='#'>Herdiansyah Blog</a></li>
<li class='hr'/>
<li><a href='#'>Contact on Facebook</a></li>
<li><a href='#'>Contact on Twitter</a></li>
<li class='hr'/>
<li><a href='#'>Free Template Design</a></li>
</ul>
</li>
Replace '#' with page or category links and default labels with your own labels, you can also add sub-categories, for example - below 'Contact us'. Next up is the news ticker, you have to register for Google Developers API Code and you will see your API key. Once done, search for this code in Edit HTML -
<script src='http://www.google.com/jsapi?key=ABQIAAAA4qkT5i26SQ6NmgJd5KQemhRQ_a6zv5_Bim3H_GL4gaueIFZ15xRdt8jcAUk8ZHokIVo-TBZgYVbkzw'/>
Replace the code marked in bold with your API key. Next step is to add your blog link, indicated in bold, in the following code, so the news update picks up the latest posts -
<div class='newspic'>
<div class='news'>
<div style='float:left;padding:5px 60px 5px 0;font:bold 14px Arial;color:#333;text-transform:none;'>
News Update :
</div>

<div style='float:left;width:800px;padding:4px 0; position:relative; overflow:hidden;'>
<script type='text/javascript'>
var cssfeed=new gfeedrssticker(&quot;example1&quot;, &quot;example1class&quot;, 4000, &quot;_new&quot;)
cssfeed.addFeed(&quot;Herdiansyah Hamzah&quot;, &quot;http://sportymagazine2.blogspot.com/feeds/posts/default&quot;) //
To activate the slider, add the below code in Layout--Add a Html/javascript gadget and paste -
<div id='featured'>
<ul class='ui-tabs-nav'>

<!-- 1st Small Image -->
<li class='ui-tabs-nav-item ui-tabs-selected' id='nav-fragment-1'><a href='#fragment-1'><img alt="" src="#" /><span>Post Title</span></a></li>

<!-- 2st Small Image -->
<li class='ui-tabs-nav-item' id='nav-fragment-2'><a href='#fragment-2'><img alt="" src="#" /><span>Post Title</span></a></li>

<!-- 3st Small Image -->
<li class='ui-tabs-nav-item' id='nav-fragment-3'><a href='#fragment-3'><img alt="" src="#" /><span>Post Title</span></a></li>

<!-- 4st Small Image -->
<li class='ui-tabs-nav-item' id='nav-fragment-4'><a href='#fragment-4'><img alt="" src="#" /><span>Post Title</span></a></li>
</ul>

<!-- First Content -->
<div class='ui-tabs-panel' id='fragment-1' style=''>
<img alt="" src="#" />
<div class='info'>
<h2><a href=' your-url-link '>Post Title</a></h2>
</div></div>

<!-- Second Content -->
<div class='ui-tabs-panel ui-tabs-hide' id='fragment-2' style=''>
<img alt="" src="#" />
<div class='info'>
<h2><a href=' your-url-link '>Post Title</a></h2>
</div></div>

<!-- Third Content -->
<div class='ui-tabs-panel ui-tabs-hide' id='fragment-3' style=''>
<img alt="" src="#" />
<div class='info'>
<h2><a href=' your-url-link '>Post Title</a></h2>
</div></div>

<!-- Fourth Content -->
<div class='ui-tabs-panel ui-tabs-hide' id='fragment-4' style=''>
<img alt="" src="#" />
<div class='info'>
<h2><a href='your-url-link'>Post Title</a></h2>
</div></div>
</div>
In the above code you have to make few changes, the first four paragraphs are for the small images on the side and next four for the slider. Replace '#' with your image url, add your post title and url link as indicated in the code. The main post column shows posts and thumbnails based on the labels you select, to activate that feature, insert the below code in Layout--Add html/javascript gadget -
<script type='text/javascript'>var numposts = 3;var showpostthumbnails = true;var displaymore = false;var displayseparator = false;var showcommentnum = false;var showpostdate = false;var showpostsummary = true;var numchars = 60;</script>

<script type="text/javascript" src="/feeds/posts/default/-/Borneo?orderby=updated&alt=json-in-script&callback=labelthumbs"></script>
Change the number of posts from 3 to whatever you like and also the label you want to display, repeat the steps to add more labels.

The sidebar has a search box with an option to search on Google, MSN and Yahoo as well. To add that feature, paste the below vode in Layout, add a gadget in the sidebar -

<form name="jksearch" action="http://www.google.com/search" method="get" onsubmit="jksitesearch(this)" target="_blank">

<input id="hiddenquery" type="hidden" name="q" />
<input name="qfront" onfocus="if(this.value==this.defaultValue)this.value=&#39;&#39;;" value="Search on this site..." type="text" onblur="if(this.value==&#39;&#39;)this.value=this.defaultValue;" style="width: 240px;border:none;padding:8px 10px; font:normal 11px arial;color:#666; background:url(http://3.bp.blogspot.com/-KPO8JYvY8q0/TaTLCf3UXqI/AAAAAAAAAk0/HMNCQmZV-YI/s1600/search_field.jpg) no-repeat;" /><input type="image" src="http://4.bp.blogspot.com/-tS-vIIuEX1Y/TaTJeZlNYPI/AAAAAAAAAkw/-OF_RBII1lw/s1600/search_button.jpg" align="top" value="Search"/>

<div style="font: normal 11px Arial;color:#666;padding:2px 0;">
<input name="se" type="radio" checked /> Google
<input name="se" type="radio" /> Yahoo
<input name="se" type="radio" /> Msn
</div>

<script type="text/javascript">

// All-in-one Internal Site Search script- By JavaScriptKit.com (http://www.javascriptkit.com)
// For this and over 400+ free scripts, visit JavaScript Kit- http://www.javascriptkit.com/
// This notice must stay intact for use

//Enter domain of site to search.
var domainroot="www.borneotemplates.com"

var searchaction=[ //form action for the 3 search engines
"http://www.google.com/search",
"http://search.yahoo.com/search",
"http://search.msn.com/results.aspx"
]

var queryfieldname=["q","p","q"] //name of hidden query form for the 3 search engines

function switchaction(cur, index){
cur.form.action=searchaction[index]
document.getElementById("hiddenquery").name=queryfieldname[index]
}
function jksitesearch(curobj){
for (i=0; i< document.jksearch.se.length; i++){ //loop through radio to see which is checked
if (document.jksearch.se[i].checked==true)
switchaction(document.jksearch.se[i], i)
}
document.getElementById("hiddenquery").value="site:"+domainroot+" "+curobj.qfront.value
}
</script>
</form>
Simply change the blog url in the code and save the changes. This template also has a twitter widget that shows your latest tweets in the sidebar. Go to Layout, add Html/javascript gadget and paste this code. Replace the default twitter handle with your id -
<div style="background:#fff url(http://4.bp.blogspot.com/-EGnF5QAztxU/TaHe6Nz0N4I/AAAAAAAAAjw/KkLBzEZ8hiw/s1600/bg_twitter.gif) no-repeat;padding-top:40px;padding-left:5px">
<script src="http://widgets.twimg.com/j/2/widget.js"></script>
<script>
new TWTR.Widget({
version: 2,
type: 'profile',
rpp: 10,
interval: 3000,
width: 285,
height: 118,
theme: {
shell: {
background: 'transparent',
color: '#000000'
},
tweets: {
background: 'transparent',
color: '#000000',
links: '#B45F04'
}
},
features: {
scrollbar: true,
loop: true,
live: true,
hashtags: true,
timestamp: true,
avatars: false,
behavior: 'default'
}
}).render().setUser('borneotemplates').start();
</script>
</div>
Download the Sporty Magazine Blogger Template

MovieSpot Blogger Template edit post

Posted by Bhavika On Thursday, July 19, 2012 0 comments
MovieSpot is a 3 column blogger template designed by New Wp Themes and converted by to blogger by Lasantha. The theme features include slider, tabbed widget, dual navigation bar and 4 column footer.
MovieSpot Blogger Template
The header logo can be added from Layout, keep the image size 388px x62px. The top menu bar shows all the blog pages automatically, and the second menu bar comes with a dropdown so you could add sub-categories. This is the code you have to look for in Edit Html -
<ul class='menus menu-secondary'>

<li><a expr:href='data:blog.homepageUrl'>Home</a></li>

<li><a href='#'>Business</a>
<ul class='children'>
<li><a href='#'>Internet</a></li>
<li><a href='#'>Market</a></li>
<li><a href='#'>Stock</a></li>
</ul>
</li>

<li><a href='#'>Downloads</a>
<ul class='children'>
<li><a href='#'>Dvd</a></li>
<li><a href='#'>Games</a></li>
<li><a href='#'>Software</a>
<ul class='children'>
<li><a href='#'>Office</a>
</li>
Reaplace '#' with the category links and add your sub-categories under '<ul class='children'>' repeat the same step for other menu bar links and save the changes. To modify the slider, go to Edit Html and search for this code -
<div class='fp-slides'>

<!-- Slide 1 Code Start -->
<div class='fp-slides-items'>
<div class='fp-thumbnail'>
<a href='#'><img src='http://2.bp.blogspot.com/-drQ63OjwgzE/T5Nkl_R1CPI/AAAAAAAAFQ4/E81qYIOUdhg/s1600/1.jpg'/></a>
</div>
<div class='fp-content-wrap'>
<div class='fp-content'>
<h3 class='fp-title'>
<a href='#'>This is default featured slide 1 title</a>
</h3>
<p>
Go to Blogger edit html and find these sentences.Now replace these sentences with your own descriptions.This theme is Bloggerized by Lasantha Bandara - Premiumbloggertemplates.com.
</p>
</div>
<div class='fp-prev-next-wrap clearfix'>
<a class='fp-next' href='#fp-next'/>
<a class='fp-prev' href='#fp-prev'/>
</div>
</div>
</div>
<!-- Slide 1 Code End -->
Replace '#' with post link, add image url, post title (as indicated in the code), and post summary, repeat the same steps for other slides as well.

The sidebar on the right shows your social profiles, search box, tabbed widget and other blogger widgets. To insert links of your social media accounts, find this code -

<div class='social-profiles-widget'>
<h3 class='widgettitle'>Social Profiles</h3>
<a href='http://twitter.com/' target='_blank'><img alt='Twitter' src='http://2.bp.blogspot.com/-oFF4HrEbwaI/To9NpETr6dI/AAAAAAAAEJk/jowvXNvTKcY/s1600/twitter.png' title='Twitter'/></a>
Add your twitter handle, below it is the code for facebook, Google +, LinkedIn etc., add the relevant ids and save.

If you want to change the tab names in the sidebar widget, then find this, and change Popular, Tags and Blog Archives. Add other widgets in the second sidebar and the footer as well.
<ul class='tabs-widget tabs-widget-widget-themater_tabs-1432447472-id'>
<li><a href='#widget-themater_tabs-1432447472-id1'>Popular</a></li>
<li><a href='#widget-themater_tabs-1432447472-id2'>Tags</a></li>
<li><a href='#widget-themater_tabs-1432447472-id3'>Blog Archives</a></li>
</ul>

Download the MovieSpot Blogger Template

Stylo Blogger Theme edit post

Posted by Bhavika On Friday, July 13, 2012 0 comments
Stylo is a 2 column blogger template created by Amaze Templates. It consists of featured posts slider, social icons, facebook widget and supports all the latest browsers.
Stylo Blogger Theme
Let's start by editing the first menu bar from Edit Html, this is the code you have to look for -
<ul class='menus menu-primary'>
<li class='current_page_item'><a expr:href='data:blog.homepageUrl'>Home</a></li>
<li><a href='#'>About</a></li>
<li><a href='#'>Services</a></li>
<li><a href='#'>Templates<span class='sf-sub-indicator'> &#187;</span></a>
<ul class='children' style='display: none; visibility: hidden; '>
<li><a href='#'>Archives</a></li>
<li><a href='#'>Contact Form</a></li>
<li><a href='#'>Full Width</a></li>
<li><a href='#'>Sitemap</a></li>
</ul>
</li>
Replace '#' with category links and the default text, under 'ul class children' you can add more sub-categories, that means under 'templates' you need to make the changes. The social media icons come in the header section, so find the following code and add your Twitter, facebook etc., account links.
<div class='social-profiles-widget'>
<a href='http://twitter.com/' target='_blank'><img alt='Twitter' src='http://1.bp.blogspot.com/-wXNK-1Pjdhs/T-uHiy5YWiI/AAAAAAAAA-8/qwTcB_24a24/s1600/twitter.png' title='Twitter'/></a><a href='http://facebook.com/' target='_blank'><img alt='Facebook' src='http://1.bp.blogspot.com/-dj5mNfp8d9g/T-uHe4PMqrI/AAAAAAAAA-c/ayYgjkNnaNY/s1600/facebook.png' title='Facebook'/></a>
The second menu bar needs to be changed as well, here's the code in Edit Html -
<li><a href='#'>Browsers</a></li>
<li><a href='#'>Computers</a></li>
<li><a href='#'>Featured</a></li>
<li><a href='#'>News</a></li>
<li><a href='#'>Parent Category</a>
<ul class='children'>
<li><a href='#'>Child Category1</a>
<ul>
<li><a href='#'>Sub Child Category1</a></li>
<li><a href='#'>Sub Child Category2</a></li>
<li><a href='#'>Sub Child Category3</a></li>
</ul>
</li>
Here you can add sub sub-categories as well, under 'Child category' and replace '#' with relevant links. Coming to the featured posts slider, you can edit the code below in Html -
<!-- Slide 1 Code Start -->
<div class='fp-slides-items'>
<div class='fp-thumbnail'>
<a href='#'><img src='http://www.amazetemplates.com/Stylo/SliderImages/1.jpg'/></a>
</div>
<div class='fp-content-wrap'>
<div class='fp-content'>
<h3 class='fp-title'>
<a href='#'>This is default featured slide 1 title</a>
</h3>
<p>
Go to Blogger edit html and find these sentences.Now replace these sentences with your own descriptions.
</p>
</div>
<div class='fp-prev-next-wrap clearfix'>
<a class='fp-next' href='#fp-next'/>
<a class='fp-prev' href='#fp-prev'/>
</div>
</div>
</div>
<!-- Slide 1 Code End -->
Firstly, replace '#' with post url, change the image url, add the post title here 'This is default featured slide 1 title' and below it add brief post description. Follow the steps for the all the slides, keep the image size 645 x 300 px.

The main column has a short summary of the post linking to the full article. While the single sidebar on the right shows different blogger widgets and ads. The code for facebook like box is given in the download folder, you can add it in the sidebar from Layout.

Download the Stylo Blogger Theme

Faustina Blogger Theme edit post

Posted by Bhavika On Friday, July 06, 2012 0 comments
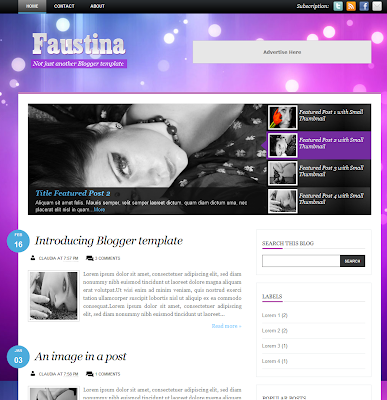
Faustina is a 2 column blogger template Chica Blogger. Its a clean theme with a slider, neat comment form and 4 column footer.
Faustina Blogger Theme
The single menu bar is on top along with social media icons. To add your account links, find the below code in Edit html and replace '#' with the respective social ids -
<a href='#'>
<img alt='Twitter' src='http://4.bp.blogspot.com/-ekXOhf-aaZo/T8GkrhrSAOI/AAAAAAAADyk/c2oUALuXBlk/s1600/twitter.png' title='Twitter'/></a>
<a href='#'>
<img alt='Feed' src='http://4.bp.blogspot.com/-ejL9RZaYKCQ/T8Gkr_7xVMI/AAAAAAAADyw/RDWLnI_maU8/s1600/feed.png' title='RSS'/></a>
<a href='#'>
<img alt='Facebook' src='http://4.bp.blogspot.com/-qyhhk3AMD4k/T8GksXxfrJI/AAAAAAAADzI/yrDf9qAnIj8/s1600/facebook.png' title='Facebook'/></a>
<a href='#'>
<img alt='Mail' src='http://4.bp.blogspot.com/-k85-E_-IhSE/T8GksCVM_gI/AAAAAAAADy8/_7uAd_05gFI/s1600/email.png' title='Mail'/></a>
</div>
Moving on to the slider, to edit you have to access Edit Html and find the following code, the images must be 600x300px, and thumbnail version of the image displays on the side of the main slider. In the code below you have to add the details twice for each slide.
<div id='featured'>
<ul class='ui-tabs-nav'>

<li class='ui-tabs-nav-item ui-tabs-selected' id='nav-fragment-1'><a href='#fragment-4'><img alt='testing' height='60' src='http://4.bp.blogspot.com/-5IXpoH4g3MY/T8GZ9ZhnVtI/AAAAAAAADxA/3B0mjqppsak/s1600/1.jpg' width='80'/><span>Featured Post 1 with Small Thumbnail</span></a></li>

<li class='ui-tabs-nav-item' id='nav-fragment-2'><a href='#fragment-3'><img alt='testing' height='60' src='http://3.bp.blogspot.com/-f4J8qY-utsY/T8GZ9nuxpWI/AAAAAAAADxM/R85emRlCuxc/s1600/2.jpg' width='80'/><span>Featured Post 2 with Small Thumbnail</span></a></li>

<li class='ui-tabs-nav-item' id='nav-fragment-3'><a href='#fragment-2'><img alt='testing' height='60' src='http://1.bp.blogspot.com/-u95qkblumu8/T8GZ-WKMSMI/AAAAAAAADxY/BsEy99jBuQQ/s1600/3.jpg' width='80'/><span>Featured Post 3 with Small Thumbnail</span></a></li>

<li class='ui-tabs-nav-item' id='nav-fragment-4'><a href='#fragment-1'><img alt='testing' height='60' src='http://4.bp.blogspot.com/-r1aybHar9rc/T8GZ-ly2KRI/AAAAAAAADxk/BsIKKdpltD0/s1600/4.jpg' width='80'/><span>Featured Post 4 with Small Thumbnail</span></a></li>
</ul>

<!-- First Content -->
<div class='ui-tabs-panel ui-tabs-hide' id='fragment-4' style=''>
<img alt='testing' height='290' src='http://4.bp.blogspot.com/-5IXpoH4g3MY/T8GZ9ZhnVtI/AAAAAAAADxA/3B0mjqppsak/s1600/1.jpg' width='600'/>
<div class='info'>
<h3><a href='#'>Title Featured Post 1</a></h3>
<p>Etiam augue pede, molestie eget, rhoncus at, convallis ut, eros...<a href='#'>More</a></p>
</div>
</div>

<!-- Second Content -->
<div class='ui-tabs-panel ui-tabs-hide' id='fragment-3' style=''>
<img alt='testing' height='290' src='http://3.bp.blogspot.com/-f4J8qY-utsY/T8GZ9nuxpWI/AAAAAAAADxM/R85emRlCuxc/s1600/2.jpg' width='600'/>
<div class='info'>
<h3><a href='#'>Title Featured Post 2</a></h3>
<p>Aliquam sit amet felis. Mauris semper, velit semper laoreet dictum, quam diam dictum urna, nec placerat elit nisl in quam...<a href='#'>More</a></p>
</div>
</div>

<!-- Third Content -->
<div class='ui-tabs-panel ui-tabs-hide' id='fragment-2' style=''>
<img alt='testing' height='290' src='http://1.bp.blogspot.com/-u95qkblumu8/T8GZ-WKMSMI/AAAAAAAADxY/BsEy99jBuQQ/s1600/3.jpg' width='600'/>
<div class='info'>
<h3><a href='#'>Title Featured Post 3</a></h3>
<p>Etiam augue pede, molestie eget, rhoncus at, convallis ut, eros...<a href='#'>More</a></p>
</div>
</div>

<!-- Fourth Content -->
<div class='ui-tabs-panel' id='fragment-1' style=''>
<img alt='testing' height='290' src='http://4.bp.blogspot.com/-r1aybHar9rc/T8GZ-ly2KRI/AAAAAAAADxk/BsIKKdpltD0/s1600/4.jpg' width='600'/>
<div class='info'>
<h3><a href='#'>Title Featured Post 4</a></h3>
<p>Aliquam sit amet felis. Mauris semper, velit semper laoreet dictum, quam diam dictum urna, nec placerat elit nisl in quam...<a href='#'>More</a></p>
</div>
Add your post url, alt text, image url, post title and description, don't forget to add these details twice for each slide. You can also replace the logo, the psd file is given in the download folder.

The main column shows the post summary with the Read More link and thumbnail. While the sidebar shows the search box and different blogger widgets. Similarly, you can customise the footer to include more blog content.

Download the Faustina Blogger Theme

Johny Bingung, a Movie Review Blogger Template edit post

Posted by Bhavika On Thursday, July 05, 2012 0 comments
Johny Bingung is a 2 column movie or game review template created by Maskolis. The template features content slider, dual menu bar, category-wise display of posts, 3 column footer and much more.
Movie Review Blogger Template
Lets begin with the first menu bar, go to Edit Html and search for this code -
<li><a href='#'><span>Action</span>Big surprise</a></li>
<li><a class='arrow' href='#'><span>Box Office</span>The best movie</a>
<ul>
<li><a href='#'>DVD</a></li>
<li class='hr'/>
<li><a href='#'>Movie</a></li>
<li class='hr'/>
<li><a href='#'>Television</a></li>
</ul>
</li>
Replace '#' with your category links, change the text and the tagline like 'Big surprise' or 'The best movie' to suit your blog categories. Similarly, to edit the second menu bar, find the following code in Edit Html and make the changes. Replace 'sub menu 1, 2, 3' with sub-categories and you can add more categories under that as well. Follow the same steps for other sections and save the changes.
<div id='dropmenu'>
<div id='nav'>
<ul>
<li><a href='/' title='Home'>Home</a></li>
<li><a href='#' title='Drop menu'>Drop menu &#8250;&#8250;</a>
<ul class='children'>
<li><a href='#' title='Sub menu 1'>Sub menu 1 &#8250;&#8250;</a>
<ul class='children'>
<li><a href='#' title='Sub menu 1.1'>Sub menu 1.1</a></li>
<li><a href='#' title='Sub menu 1.2'>Sub menu 1.2</a></li>
<li><a href='#' title='Sub menu 1.3'>Sub menu 1.3</a></li>
</ul>
</li>
Moving on to the featured content slider, it picks up articles based on the selected label or category. Go to Layout, click on 'edit' feature content slider and add the label in 'content' box.
Below the navigation bar is the search box, category drop down section and subscription email box. In order to change the feed address, in Edit Html, check the expand widget templates box and find this code. Add your feed url in places marked in bold.

<form action='http://feedburner.google.com/fb/a/mailverify' id='subscribe' method='post' onsubmit='window.open(&apos;http://feedburner.google.com/fb/a/mailverify?uri=blogspot/htbgh&apos;, &apos;popupwindow&apos;, &apos;scrollbars=yes,width=550,height=520&apos;);return true' target='popupwindow'><input id='subbox' name='email' onblur='if (this.value == &apos;&apos;) {this.value = &apos;Enter your email address...&apos;;}' onfocus='if (this.value == &apos;Enter your email address...&apos;) {this.value = &apos;&apos;;}' type='text' value='Enter your email address...'/><input name='uri' type='hidden' value='blogspot/htbgh'/><input name='loc' type='hidden' value='en_US'/><input id='subbutton' type='submit' value='Enter'/></form>

The main column automatically displays post thumbnails with comments in a grid format. While the sidebar comes with widgets which can be customised, you can show reviews from a particular category/label. To activate that feature, go to Layout, click on 'Edit' Moview Review and insert the below code, replace the text marked in bold with your blog url and the label -

<script type='text/javascript'>var numposts = 1;var showpostthumbnails = true;var displaymore = false;var displayseparator = false;var showcommentnum = false;var showpostdate = false;var showpostsummary = true;var numchars = 60;</script>

<script type="text/javascript" src="/feeds/posts/default/-/play station?orderby=updated&alt=json-in-script&callback=labelthumbs"></script>

<script type="text/javascript">
function recentpostslist(json) {
document.write('<ul>');
for (var i = 1; i < json.feed.entry.length; i++)
{
for (var j = 1; j < json.feed.entry[i].link.length; j++) {
if (json.feed.entry[i].link[j].rel == 'alternate') {
break;
}
}
var entryUrl = "'" + json.feed.entry[i].link[j].href + "'";//bs
var entryTitle = json.feed.entry[i].title.$t;
var item = "<li>" + "<a href="+ entryUrl + '" target="_blank">' + entryTitle + "</a> </li>";
document.write(item);
}
document.write('</ul>');
}
</script>
<script src="http://johny-backup.blogspot.com/feeds/posts/summary/-/play station?max-results=6&alt=json-in-script&callback=recentpostslist"></script>
<a href="http://johny-backup.blogspot.com/search/label/play station" style="float:right;font:normal 11px Arial;padding:5px 0;">More on this category &#187;</a>
The internal post pages include social bookmarking icons, related articles and Facebook like button, making it easy to share content. The theme also has a neat looking comment form, to get that working simply replace your blog id in the code below, which is marked in bold.

<div class='cm_reply'>
<a expr:href='&quot;https://www.blogger.com/comment.g?blogID=4900105838884725772&amp;postID=&quot; + data:post.id + &quot;&amp;isPopup=true&amp;postBody=%40%3C%61%20%68%72%65%66%3D%22%23&quot; + data:comment.anchorName + &quot;%22%3E&quot; + data:comment.author + &quot;%3C%2F%61%3E#form&quot;' onclick='javascript:window.open(this.href, &quot;bloggerPopup&quot;, &quot;toolbar=0,location=0,statusbar=1,menubar=0,scrollbars=yes,width=600,height=500
&quot;); return false;'>Reply</a>
</div>
You will get the blog id on your browser address bar when you go to the dashboard.

Download the Johny Movie Review Blogger Template

    Recent Templates

    Recent Comments

    Video Guides