Blogger Store

Created for bloggers who want to start an e-commerce or shopping site, Blogger Store is a professional looking template compatible with Paypal or Google Checkout

  • Animated shopping cart
  • Dual dropdown menu bar
  • Automatic featured content carousel
  • Grid and list style post view
Blogger store shopping blogger template

Lightroom Photo Blog Template

A beautiful photo blog template that displays photos in gallery format and is available in two styles basic and advanced

  • Switchable background
  • Attractive theme font
  • Integrated social media icons
  • Left sidebar and navigation menu
Lightroom Photo Blog Template

Magpress

Magazine style theme adapted from wordpress

  • Featured slider section
  • Dual menu bar
  • Tabbed widget
  • 4 column footer
Magpress Magazine style Blog Template

Sens

A simple theme with a clean layout

  • Full width featured slider
  • 4 column footer
  • Social widgets integrated
Sens Blogger template

Pop Out Social Bookmarking Widget

A nice-looking pop out social bookmarking widget that allows readers to share their favorite post easily

  • Neat display
  • Easy to install
Add pop out social bookmarking widget for blogger

Lightroom Photo Blog Template edit post

Posted by Bhavika On Wednesday, November 30, 2011 7 comments
Lightroom is a lovely photography blog template created by Dzignine. Its a 2 column template that displays photos in gallery format on the home page and sidebar on the left. Lightroom is available in two styles basic and advanced, lets take a look at some of the features.
Lightroom advanced Photo Blog Template
In the basic version only one image of 740x740 appears on the home page while in the advanced style the entire photo gallery loads. The theme has a switchable background which is easy to change via template designer (in old Blogger interface) or 'Customize' (in new Blogger interface) then locate the 'background' tab. Select a background from blogger's default list or upload your own.
Lightroom basic Photo Blog Template

Change blog font colours etc. from Template Designer, although the theme comes with an attractive font - Times New Roman - which enhances the overall look of the blog. In order to insert your own blog logo in the header, go to Layout or Page Elements, click on edit 'Header' and upload your file.

The menu bar appears below the logo in the left sidebar along with blogger widgets like Popular Posts, Archives, Categories. Currently, the blog is aligned to the left, you can center align it by adding the below code after #outer-wrapper { from Edit Html.

Margin:0 auto;

The post pages include social bookmarking buttons and a neat comment form.

Download the Lightroom Photo Blogger template

Gears, an Auto Listing Blogger Theme edit post

Posted by Bhavika On Wednesday, November 23, 2011 0 comments
Gears is a 2 column auto listing template designed by Web2Feel and ported to blogger by Best Theme. The theme features include a slider, dropdown labels/categories bar/
gears the blogger template
Once you've uploaded the blogger template, edit the slider images from Design--Edit Html and find this code -

<b:if cond='data:blog.url == data:blog.homepageUrl'>
<div id='pslider'>
<div class='spanel'>
<img alt='' class='slideimg' src='http://3.bp.blogspot.com/-MM04qAN48Ro/TsSZX30JE9I/AAAAAAAAGSs/K42XSHuVIgU/s1600/wallpaper-16004-1024x640.jpg' title=''/>
</div>

<div class='spanel'>
<img alt='' class='slideimg' src='http://1.bp.blogspot.com/-IanfKPcAQmk/TsSaxYedmEI/AAAAAAAAGS4/I0TpkpHd7ig/s1600/2010_porsche_boxster-1024x640.jpg' title=''/>
</div>

Replace the image urls (ideally image size should be 1024x640), add alt text and insert the title, follow the same steps for subsequent slides and save the changes. Below the slider is a select category bar where you display model year, maker, body type, price range etc., in dropdown format. To edit the text go to Edit Html and search for this code -
<div id='filter'>
<div class='clearfix' id='browselist'>
<p class='listin'>
<span>Car Condition</span>
<br/><script type='text/javascript'>
jQuery(document).ready(function($){
$(&quot;select#condition-dropdown&quot;).change(function(){
window.location.href = $(this).val();
});
});
</script>
<select id='condition-dropdown' name='condition-dropdown'><option value='#'> - Select - </option>

<option value='#Link'>New</option>
<option value='#Link'>Used</option>
</select>
</p>

<p class='listin'>
<span>Model Year</span>
<br/><script type='text/javascript'>
jQuery(document).ready(function($){
$(&quot;select#model_year-dropdown&quot;).change(function(){
window.location.href = $(this).val();
});
});
</script>
<select id='model_year-dropdown' name='model_year-dropdown'><option value='#'> - Select - </option>

<option value='#Post Label Link'>2008</option>
<option value='#Post Label Link'>2009</option>
<option value='#Post Label Link'>2010</option>
<option value='#Post Label Link'>2011</option>
</select>
</p>

<p class='listin'>
<span>Maker</span>
<br/><script type='text/javascript'>
jQuery(document).ready(function($){
$(&quot;select#make-dropdown&quot;).change(function(){
window.location.href = $(this).val();
});
});
</script>
<select id='make-dropdown' name='make-dropdown'><option value='#'> - Select - </option>

<option value='#Post Label Link'>Aston Martin</option>
<option value='#Post Label Link'>Audi</option>
<option value='#Post Label Link'>BMW</option>
<option value='#Post Label Link'>Dodge</option>
<option value='#Post Label Link'>Ferrari</option>
<option value='#Post Label Link'>Porsche</option>
</select>
</p>

<p class='listin'>
<span>Body type</span>
<br/><script type='text/javascript'>
jQuery(document).ready(function($){
$(&quot;select#body-dropdown&quot;).change(function(){
window.location.href = $(this).val();
});
});
</script><select id='body-dropdown' name='body-dropdown'><option value='#'> - Select - </option>

<option value='#Post Label Link'>Convertible</option>
<option value='#Post Label Link'>Coupe</option>
<option value='#Post Label Link'>Roadster</option>
</select>
</p>

<p class='listin'>
<span>Price range</span><br/>
<script type='text/javascript'>
jQuery(document).ready(function($){
$(&quot;select#car_price-dropdown&quot;).change(function(){
window.location.href = $(this).val();
});
});
</script><select id='car_price-dropdown' name='car_price-dropdown'><option value='#'> - Select - </option>

<option value='#Post Label Link'>120k - 130k</option>
<option value='#Post Label Link'>150k - 160k</option>
<option value='#Post Label Link'>160k - 170k</option>
<option value='#Post Label Link'>40k - 50k</option>
<option value='#Post Label Link'>50k - 60k</option>
<option value='#Post Label Link'>60k - 70k</option>
<option value='#Post Label Link'>80k - 90k</option>
</select></p>
</div></div>

Now replace #Post Label Link with your created post label url, and you can change the category options as well. Please note - All the options are labels, so make sure to include the right labels in your post. Although the user can only select one option at a time, there is no multiple selection of labels.
a single post of the gears theme
On entering a post there is a snippet giving complete information of the car, so whenever you create a new post you have to paste the below code, under New Post-Edit Html tab and insert the image link, alt text and fill in all the details or modify it if you like -
<img class="singimg" src="http://3.bp.blogspot.com/-MM04qAN48Ro/TsSZX30JE9I/AAAAAAAAGSs/K42XSHuVIgU/s1600/wallpaper-16004-1024x640.jpg" alt="" />

<div class="cardetails clearfix">
<span><strong>Year :</strong> <a href="#Link" rel="tag">2010</a></span>
<span><strong>Body type :</strong> <a href="#Link" rel="tag">Coupe</a></span>
<span><strong>Make :</strong> <a href="#Link" rel="tag">Porsche</a></span>
<span><strong>Model :</strong> 911 GT3</span>
<span><strong>Color : </strong>Yellow</span>
<span><strong>Transmission : </strong>Automatic</span>
<span><strong>Fuel type :</strong> Gasoline</span>
<span><strong>Price :</strong> $130000</span>
</div>
Below the code you can post your entry or add a description. On the top right corner of the slider is the contact bar to include your name, email, phone number etc. To modify the details go to Design--Edit Html, find this code and insert your details -

<div id='contactlist'>
<ul>
<li>Name : <span>Thecarguy</span></li>
<li>Email :<span>carguy@xample.com</span></li>
<li>Phone : <span>1800-GETURCAR</span></li>
<li>Twitter : <span>cartweet</span></li>
</ul>
</div>

The template also includes a single sidebar and 4 column footer to display additional information, put up ads etc.

Download the Gears, an Auto Listing Blogger Theme

Blogger Store, Shopping Template edit post

Posted by Bhavika On Friday, November 04, 2011 4 comments
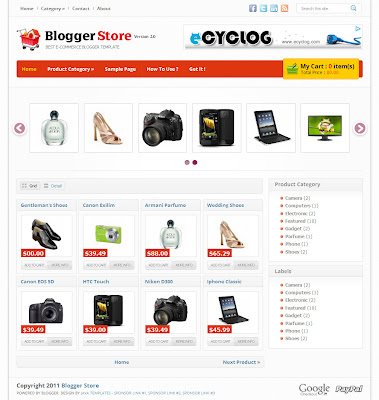
If you are looking to start an e-commerce or shopping site then this is the theme for you. Blogger Store is a better version of the shopping cart template designed by Java Templates and Zoom Template. The template includes dual dropdown menu bar, slider, grid and list style post view, animated shopping cart and more.
blogger store shopping template grid view
Once you have uploaded the theme, you can start with customising the template settings. In order to change the Shopping Cart code, go to Edit Html and search for this -

<script type='text/javascript'>
//<![CDATA[
/* SIMPLE CART SETTING
>>>>>>>>>>>>>>>>>>>>>>>>*/
simpleCart.email = 'rifkiblogger@gmail.com';
simpleCart.checkoutTo = PayPal;
simpleCart.currency = USD;
simpleCart.cartHeaders = ['name','thumb_image','Quantity_input','increment', 'decrement','Total'];
//]]>
</script>

Replace the email id marked in bold, and change the default currency 'USD' to your currency, please check the list of available currency in the download folder and save the changes. To proceed with the navigation bar, edit the links in the top menu from Edit Html and add your links here '#' and related text -

<ul id='top-nav'>
<li><a href='#'>Home</a></li>
<li><a href='#'>Category</a>
<ul class='sub-menu'>
<li><a href='#'>Category 1</a></li>
<li><a href='#'>Category 2</a></li>
<li><a href='#'>Category 3</a></li>
</ul>
</li>
<li><a href='#'>Contact</a></li>
<li><a href='#'>About</a></li>
</ul>
Similarly for the second menu bar, modify the links and categories in the below code -
<ul class='nav'>
<li><a class='current' href='/'>Home</a></li>
<li><a href='#'>Product Category</a>
<ul>
<li><a href='#'>Camera</a></li>
<li><a href='#'>Gadget</a></li>
<li><a href='#'>Electronic</a></li>
<li><a href='#'>Phone</a></li>
</ul>
</li>
<li><a href='/p/sample-page.html'>Sample Page</a></li>
<li><a href='#'>How To Use ?</a></li>
<li><a href='#'>Get it !</a></li>
</ul>

Coming to the slider that can be used to display your featured products, the default setting will show your latest posts. If you want to show posts by specific label/category, go to Edit Html and search for this line of code -

<script src='/feeds/posts/default?orderby=updated&amp;alt=json-in-script&amp;callback=featured_product' type='text/javascript'/>

Replace it with this one, and add the label/category -

<script type="text/javascript" src="/feeds/posts/default/-/YOUR LABEL HERE?orderby=updated&amp;alt=json-in-script&amp;callback=featured_product"></script>
blogger store template detail view
Before you start creating new posts you need to insert a code in Settings--Formatting--Post Template (this would be in the old blogger interface) in the new one its Settings--Posts.

<div class="item_image">
<img border="0" class="item_thumb" src="product_image.jpg" />
<span class="item_price">$00.00</span>
</div>

<div class="item_Description">
Descriptions...
</div>

Now you create a post, put in a product title which will also be the product name on ShoppingCart, add an image (preferred size is 140x140), copy the image URL and paste it in the below code, add the product price, description and you are set to publish.

<div class="item_image">
<img border="0" class="item_thumb" src="http://example.com/product_image.jpg" />
<span class="item_price">$00.00</span>
</div>
<div class="item_Description">
Product description.
</div>

There is an animated shopping cart button in the second menu bar that shows the total items and price, on clicking on it detailed view of the products purchased pops up.

Download the Blogger Store, Shopping Template

    Recent Templates

    Recent Comments

    Video Guides